Monday, September 23, 2019

Oversized Tag with Sandi ~ Creative Embellishments

Hello, scrappy friends! 

Sandi here with you today sharing my latest project for Creative Embellishments

You may have noticed that I love to create using the CE Large Tags. These guys are 10 inches tall and have become my preferred size for creating a "layout."

Much like a canvas inspires me to create a mixed media project, these inspire me to layer, layer and layer some more using chipboard and ephemera and flowers.


The photo is of my sweet little niece Lexi.  I pulled out an older kit from one of the kit clubs and made use of all the bit and bobs to co-ordinate with the chipboards
I have chosen: Old World Map, mediumView Master Photo Slides and Paper clips.


The Old World Map was chosen because Lexi's parents Love to travel! And since she's been traveling from Day One, baby girl loves to travel as well. All my chipboard elements were sprayed with walnut ink with some added gold shimmer. Simple but it really makes the chipboard pop!


View Master Photo Slides are so fun to use! I think they are one of the hidden gems of our selection of chipboard pieces! CE has been in business for 6 years this month, so there have been loads of additions with new products every month!


I'm swooning over the Old World Map, medium. Although I used it more as a layering piece than a stand alone, it just really gives a traveling vibe! There are 3 sizes of these guys plus you can custom order a specific size as needed for your project.


I wanted to catch a side view to share a little of my dimension.
Isn't that Paper clips piece just adorable?!


Lots of layers and finished with a bow!

Thanks for coming by today!
I hope you will check out the Creative Embellishments store when you have a few minutes! Lots of cute items.
Time to stock up for your holiday creating!

Sandi


Creative Embellishments used: 
Chipboard: 

Thursday, September 19, 2019

13 Arts Canvas ~ Lucy

Hello,  everyone! 

I am up on the 13 Arts Blog today sharing a canvas featuring our new Summer Rhapsody collection along with our Watercolor Set of colors. 

What a great combo! 


I've been itching to share some work with our fabulous Watercolor set of 16 pans because they provide such intensity of color. I went a step further and chose some colors outside my comfort zone. While so many like pink and purple, I am more of a peach, coral with aqua kind of gal. 

For fun, I chose to scrap this publicity photo of Lucille Ball that is just relaxed and funny. 


I prepared my background with some Modeling paste and MAGIC Powder to thicken it and achieve a more crackled look. Then I started with my Watercolors and created an ombre wash using the watercolors and lots of water. Colors used were Pink, Magenta, Violet and Indigo.


For my photo layers I've torn pieces from the Summer Rhapsody collection: Pink Thoughts Serendade and Music is Everywhere. I've also tucked on some embellishments from the Summer Rhapsody Ephemera pack as well as the In Bloom Ephemera Pack.


Prior to adhering the focal area, I randomly stamped my canvas background with black ink and the Magic Door Stamp. It looks great when hand stamped or when using a block. It's certain to become a fave!


I rounded out my piece with some splattering of 13 Arts SPLASH White Ayeeda Ink and White Gesso. For further dimension I added some Violet Hologram Glitter as well as some colored moss from my stash.

This was so fun create!
Watercolors are amazing to work with as you can achieve even the lightest of intensities if you wish!

Thanks for coming by the blog today!
Here is a list of my products:

Pink Thoughts, Summer Rhapsody
Watercolor set 16 pans - set of watercolors, pink, magenta, violet, indigo


Wednesday, September 18, 2019

Another ~ Oversized Teepee Card for Creative Embellishments

Hello, CE fans!

Sandi here with you today sharing my latest Design Team project for Creative Embellishments.

Because I recently created an oversized, modified Teepee card for another team, I wanted to do another one right away while the technique was fresh on my mind. Every time I make one, I have to remind myself on how to assemble it correctly, how to arrange the papers and also fold them the way I prefer. I'm keeping this one as my ongoing sample. At least for awhile ...


I like mine to be oversized (this one is 6.5 inches high) and although they stand on their own, I can fold them flat and make them to stand with three points versus four. This is a really nice way to make something special for someone. People like the large size and have fun playing around with the flaps. It's also a great way to display multiple co-ordinating patterned papers as I did here with the new 13 Arts Summer Rhapsody paper.

I also like to use any of the Creative Embellishments frames or circles to wrap around the card and serve as a belly band of sorts. It keeps it semi- closed but mostly looks pretty and adds a bit of drama. This time I used the Leafy Flourish Frame which I painted gray and then changed my mind and re-painted it black and then added a black glitter paint from 13 Arts. My sentiment was from the Small Sentiment Words and was painted white. For one last bit of chipboard, I added a leaf from the Autumn Leaves set and left it bare except for dabbing it with gesso. It is tucked in beside the pink flower.


 Here is a look at the card without the Leafy Flourish Frame. I usually add a sentiment banner of some sort. This time I used the Thinking of You from the Small Sentiment Words.  I also randomly stamped my papers with black ink and my fave Circle Bokeh Stamp. I'd be lost without that stamp!


On the inside I drew some lines on the right side with a black felt tip pen where I could add a sentiment. Alternatively you could add some white card stock and use that. Or a journaling note ... whatever you like. 


I lifted the flaps to show you how the squares are attached when looking at this angle. I don't decorate  this area so that the card can lay flatter but you could if you liked or if you were going to make it stand differently.


I don't generally add any embellishments to the back except maybe a button near the top to help secure the belly band sometimes. I have also sometimes glued the belly band to the front left or right of the card and then snipped it in two on the back side so that it can be opened from the front by the recipient.  Here is an example of another one card where I did that HERE ... about midway down in the post. I did do some more random stamping as you can see.

That's it for today!
Thanks for coming by.


Creative Embellishments products used:

Chipboard:
Leafy Flourish Frame
Small Sentiment Words
Autumn Leaves

Stamp:
Circle Bokeh Stamp


Papers and mediums are all 13 Arts


Friday, September 13, 2019

Fun Shaker and Tag with Sandi ~ Creative Embellishments

Hello, Creative Embellishments friends and fans! 

Sandi  here with you today sharing another project for Creative Embellishments! 


It's no secret that I love creating on Nicolle's Large Tags, 10. inch. They have become an ideal size for me to create and yet are something different from a greeting card or ATC. 

Here I've used a cute photo of a couple of the grand girls acting silly. I thought it would be ideal for using as a background for my Square Shaker Set. Since the photo is kinda goofy, who cares if we have sequins and beads rolling around on top of it, right? Just adds to the fun! 


For my purposes, I painted my shaker set pieces all a true white. I did the same with my Feeling the Love Frame and my title piece. I did later decided to brush everything with a some distress ink but painting first makes everything look more finished. The Shaker set consist of the base shape, 2 shape spacers, the acrylic and the top shape. This was you can get some pretty good height for your sequins, beads or other elements. 


The Feeling the Love Frame was set at a bit of an angle, so that my little Clara's face wouldn't be covered too much. Toward the end of my project, I added brown watercolors around my focal areas. 


The heart stems were also watercolored with the brown medium.  You can really check out all the sequins in this shot. These are from Buttons Galore and More. 


Sometimes searching for the right title piece takes longer than you might think. I finally settled on the Be Yourself from a newish set: Everyday Word Set.  I made a banner and added a few embellishments all around. Papers and medium are all 13 Arts. Naturally, I had to add a BEE! 


Of course, let's not forget the Large Tag, 10. inch itself which was covered with papers from 13 Arts "In Bloom" paper collection. I've used the 6x6 paper pad today. 
To give more dimension to my tag, I randomly stamped with the Binary Stamp which is a great subtle stamp for your backgrounds. 

I added a few embellishments and splattered some gesso and was done! 

I hope you'll take time to join our Facebook group and share your own CE projects! 
Thanks for coming by. 


Creative Embellishments products used: 

Chipboard:
Stamp:

Sunday, September 1, 2019

13 Arts September Challenge ~ Discover

Hello, everyone! 
Well, once again we have made it to September! 
It is still hot here in Texas but I am dreaming of some cool, crisp Fall weather. 

We have a really cool challenge this month over at the 13 Arts Blog. 
I interpreted it as a color challenge and also wanted to add some Rust Effects to go along with the Urban Decay featured in a few of the images. 


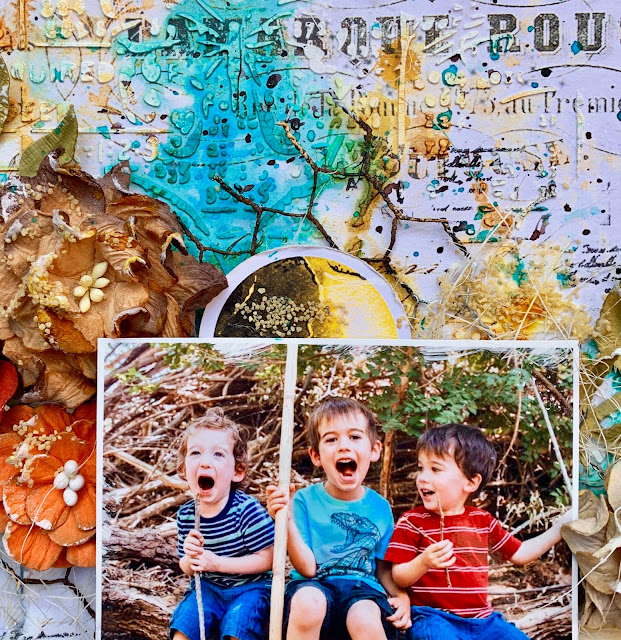
These are 3 of the grand boys having a fun-filled afternoon. I left the photo in color as some of the mood board colors are there. I did some distressing and tearing while I rusted my chicken wire with the Rusty Bronze Rust Effect Powder and the Rust Reagent

Of course, I prepared my background with clear gesso, did some random stamping with the new 
Numbers Stamp. Then I added some stenciling with the gorgeous Grungy Butterflies Stencil. I accentuated the stencil with my Rainbow Color Duo Turquoise and my Amber Color Glow


Next it was a matter of finalizing my design placement and getting the texture and color balance just like I wanted it. 
For added texture I used some of our Colored Grit ~ Yellow Sand


You can see that a little better right here .. as well as the Rust Effect on the chicken wire. 


I finished with some gesso dabbing and paint splattering. 
Although this did not turn out exactly as I planned, I am pleased with these results. 


Here is the inspiration photo:


Isn't it amazing? 

Thanks for coming by! 
See you soon! 
Sandi


13 Arts Products used: