Hello, CE fans!
Sandi here with you today sharing my latest Design Team project for Creative Embellishments.
Because I recently created an oversized, modified Teepee card for another team, I wanted to do another one right away while the technique was fresh on my mind. Every time I make one, I have to remind myself on how to assemble it correctly, how to arrange the papers and also fold them the way I prefer. I'm keeping this one as my ongoing sample. At least for awhile ...
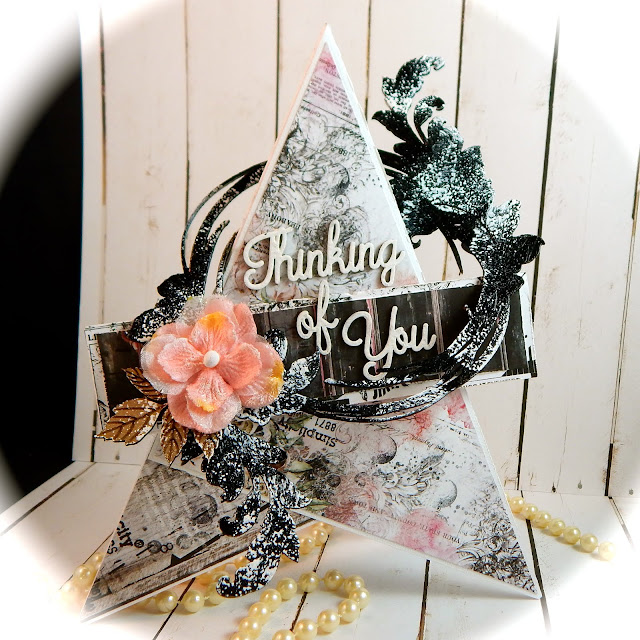
I like mine to be oversized (this one is 6.5 inches high) and although they stand on their own, I can fold them flat and make them to stand with three points versus four. This is a really nice way to make something special for someone. People like the large size and have fun playing around with the flaps. It's also a great way to display multiple co-ordinating patterned papers as I did here with the new 13 Arts Summer Rhapsody paper.
I also like to use any of the Creative Embellishments frames or circles to wrap around the card and serve as a belly band of sorts. It keeps it semi- closed but mostly looks pretty and adds a bit of drama. This time I used the Leafy Flourish Frame which I painted gray and then changed my mind and re-painted it black and then added a black glitter paint from 13 Arts. My sentiment was from the Small Sentiment Words and was painted white. For one last bit of chipboard, I added a leaf from the Autumn Leaves set and left it bare except for dabbing it with gesso. It is tucked in beside the pink flower.

Here is a look at the card without the Leafy Flourish Frame. I usually add a sentiment banner of some sort. This time I used the Thinking of You from the Small Sentiment Words. I also randomly stamped my papers with black ink and my fave Circle Bokeh Stamp. I'd be lost without that stamp!


I don't generally add any embellishments to the back except maybe a button near the top to help secure the belly band sometimes. I have also sometimes glued the belly band to the front left or right of the card and then snipped it in two on the back side so that it can be opened from the front by the recipient. Here is an example of another one card where I did that HERE ... about midway down in the post. I did do some more random stamping as you can see.
That's it for today!
Thanks for coming by.
Creative Embellishments products used:
Chipboard:
Leafy Flourish Frame
Small Sentiment Words
Autumn Leaves
Stamp:
Circle Bokeh Stamp
Sandi here with you today sharing my latest Design Team project for Creative Embellishments.
Because I recently created an oversized, modified Teepee card for another team, I wanted to do another one right away while the technique was fresh on my mind. Every time I make one, I have to remind myself on how to assemble it correctly, how to arrange the papers and also fold them the way I prefer. I'm keeping this one as my ongoing sample. At least for awhile ...

I like mine to be oversized (this one is 6.5 inches high) and although they stand on their own, I can fold them flat and make them to stand with three points versus four. This is a really nice way to make something special for someone. People like the large size and have fun playing around with the flaps. It's also a great way to display multiple co-ordinating patterned papers as I did here with the new 13 Arts Summer Rhapsody paper.
I also like to use any of the Creative Embellishments frames or circles to wrap around the card and serve as a belly band of sorts. It keeps it semi- closed but mostly looks pretty and adds a bit of drama. This time I used the Leafy Flourish Frame which I painted gray and then changed my mind and re-painted it black and then added a black glitter paint from 13 Arts. My sentiment was from the Small Sentiment Words and was painted white. For one last bit of chipboard, I added a leaf from the Autumn Leaves set and left it bare except for dabbing it with gesso. It is tucked in beside the pink flower.


On the inside I drew some lines on the right side with a black felt tip pen where I could add a sentiment. Alternatively you could add some white card stock and use that. Or a journaling note ... whatever you like.

I lifted the flaps to show you how the squares are attached when looking at this angle. I don't decorate this area so that the card can lay flatter but you could if you liked or if you were going to make it stand differently.

I don't generally add any embellishments to the back except maybe a button near the top to help secure the belly band sometimes. I have also sometimes glued the belly band to the front left or right of the card and then snipped it in two on the back side so that it can be opened from the front by the recipient. Here is an example of another one card where I did that HERE ... about midway down in the post. I did do some more random stamping as you can see.
That's it for today!
Thanks for coming by.

Creative Embellishments products used:
Chipboard:
Leafy Flourish Frame
Small Sentiment Words
Autumn Leaves
Stamp:
Circle Bokeh Stamp
Papers and mediums are all 13 Arts
This is stunning! LOVING the colors and the shine!!!
ReplyDeleteFabulous!!!
ReplyDelete