Pages

Wednesday, April 30, 2014

Sketchabilities #114 Reveal Day!


Hello there, crafty peeps! Today is Reveal Day once again over at Sketchabilities and we are sharing Sketch #114! As always, I adored this one! Karan's sketch are perfect for giving your pages the right "bones." This is my last Reveal at Sketchabilities as our term is coming to an end. I hope to re-aaply sometime in the future when my schedule is not so hectic. Not to mention that my flower gardens are calling me .. love this time of year! 

I've used the gorgeous Prima Stationer's Desk Collection for this page with dgd MacKayla. I texturized my papers slightly with a stencil, molding paste and Lindy's Stamp Gang as well as stamps with brown ink. I veered just a bit from the sketch with adding all the florals on the left but I thought I needed them, LOL! Love these burlap Petaloo. 

Here's some close-ups:


Inkido and Prima stamps along with my stencil, molding paste and mist. 


Left floral cluster with some Stationer's Desk chipboard. 


A bit of punch work, more chipboard and a wooden butterfly.  I adore these  ivory burlap Petaloo blooms that I've misted slightly with green. 

And here is that sketch! 


So many possibilities, right?
 We hope that you will play along with us this time. You'll have through May 13 to upload over at Sketchabilities. Can't wait to see what you create! 

And thanks again to Karan for having me this term! I've loved being part of a site that I've admired for such a long time! 

Tuesday, April 22, 2014

With Love ~ Creative Embellishments


Hello, Creative Embellishments fans! I am back with another card today. I know... hard to believe, huh? But I was needing to send out a card and I had this luscious purple Prima flower I'd been wanting to use. One thing led to another! 

After choosing a background paper, I decided on the Moroccan Lattice to layer next, altering it very simply with some Distress Ink in Vintage Photo and trimmed it down to fit my card. After adhering it, I did a little background watercoloring in the random shape of a heart .. very haphazardly but just enough to help define the area inside where the Heart Flourish would be. 


Then I set about altering the Heart Flourish. Of course with me, I keep trying colors until I get exactly the look I'm wanting. I started with gesso, then  Shimmerz in Royal purple but added  Silks Acrylic 
Glaze, Vavoom Red. Over that I've again added Glossy Accents and dropped some microbeads on the piece while the GA was still wet. 


The leafy/flourishy part of the heart was done in my usual style:  gesso, distress ink and a touch of Glimmer Glam. Promise to do something different next time. =) You can also see a bit of the cheesecloth I've tucked behind my flower. 


And of course, the fab flower that inspired it all served as a beautiful base for my sentiment title. I gave the With Love chipboard an ombre look with white gesso and distress ink on the lower part of the letters.  I dabbed on a bit of Icicle Stickles for just a touch of shine. 


Here is the finished result. Maybe a bit too glossy a look than I really wanted but it turned out beautifully in spite of me! 

Thanks for coming by today! 

Heart Flourish


Supplies:

Distress Ink, Broken China, Vintage Photo and Antique Linen
Stickles, Icicle
Shimmerz, Royal purple
Silks Acrylic Glaze, Vavoom Red
Quick  Quotes PowderPuff Chalk Ink, Purple Passion
Quick Quotes PowderPuff Chalk Ink, Green with Envy Green
Silks Acrylic Glaze, Pretty Peridot
Silks Acrylic Glaze, Olive Green
Tattered Angels Glimmer Glam, Dirty Martini
Riddersholm Fall Flea Market, Classifieds
Petaloo Spring Berry Clusters, Lavender
Prima Frilles Plum

Monday, April 21, 2014

April Tutorial for My Creative Scrapbook. Limited Edition Kit

As seen on the My Creative Scrapbook blog last Monday …. 

Hello, everyone! Sandi here with you today sharing a few design detailing tips using the My Creative Scrapbook April Limited Edition Kit featuring lots of great Crate Paper, Prima, Studio Calico and more! 


I thought a little bit of ruffled paper "lace" would look great on one of my pages and selected a neutral paper "scrap" from the kit along with one of my fave Martha Stewart vintage doily punches. 


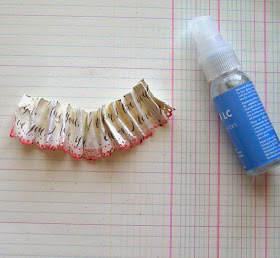
I cut a strip about 1 and 1/2 inches wide and then used my punch along one of the long edges. 


Next I took a Distress Ink (Worn Lipstick) and inked the punched edges. 


Then I moistened the paper with a small mister of water.  If you don't have a mini-mister, any small bottle you have on hand  will work just fine.  At this point, you can either pleat your paper or "gather" it with your hands as I've tried to do.  Both ways look great! 


When that was done, I took one of my photos and put a strip of Tacky Tape at the bottom on the backside.  Then I lifted the protective red strip and attached my paper ruffle carefully.  I also placed some corrugated cardboard on the back of my photo to "lift" it off the page since the ruffle gives you some nice dimension under the photo. 


Turn your photo over and there is your lovely ruffle! These paper ruffles are also great for attaching to a small circle of paper and creating a lacy flower! 


This is how it looked when my layout was completely done. 

***

While I'm here, I thought I'd share a few steps in how I prepared the alpha embellishments on my "Forever Friends" page. 


After preparing the basic edges of your layout, use molding paste and a flat spatula to add texture to your page where you plan to attach your alphas. 


This is how mine looked at that point. Dry with a heat gun or allow it  t dry naturally. 


Next add some Viva white crackle paint .. or whatever you have in your stash! Crackle paint needs to dry naturally for the best results, so you'll need to wait a few hours before moving on. I love the look this gave to my page, so it was totally worth the wait. I've also applied the Crackle paint to the edges of my layout as well as on a few of my other elements. 


Then sprinkle some mist drops in whatever color you like  or have on hand by removing the uptake nozzle from your bottle and flicking or tapping on it. 


Then begin adding your alphas in a random pattern, some going horizontally and some vertically. 


Spray out a bit of your mist if you want to alter the color of your letter as I did. Paint it on. 


After adding color, I used more of the crackle paint, this time on my alphas. After that dried a few hours, I added some Sno-Tex from my stash for a nice, frosty feel. The Sno-Tex has also been added to a corner of the page to complete the wintry feel. I know most of us are tired of the long Winter but I like using a Kit in slightly unexpected ways. 


And this is my completed page! 

Thanks for coming by today and letting me share. 

Thursday, April 17, 2014

Guest Designing at Something Tattered Stamps

Good morning, everyone! I am so excited to be Guest Designing today for Something Tattered.  Many thanks to Beth for having me and for the fabulous GDT package. And of course, to my good friend Tracey for inviting me. 


I love doing mixed media canvas projects and creating personal works of art to hang in my craft room. As you can see here, I had great fun with this one! Because I've had a very full calendar the past 8 weeks or so, I was motivated by the saying you see below from Prima's Something Blue collection. 

First of all I prepared my canvas with a coat of white gesso. Next I created a rainbow of colors using a variety of mists and gelatos using water and a paper towel to get just the effect I wanted. Some added drops from the uptake nozzle were the finishing touch.  Because I wanted my stamping to be in specific places, I decided to do that next before moving on to adding my texture paste. 


Keep Calm and Plan On! The saying that inspired my project. Planning and keeping a detailed schedule helps keep my anxiety at bay.  


The upper left corner of the canvas seemed a fitting place for the C-est vous chandelier stamp. I've used Staz-on in black to stamp my image. Because I was dealing with a flexible surface and wanted a very crisp image (at least to start,) I used my stamp and a glass block. Then used a book under the canvas to ensure the best result. The remainder of my my stamping was "rolled" on without a block. Here you can see the C-est vous chandelier stamp, the  Powdered antique wall stamp and the French script poem stamp.  Stamps are such an effective way to build additional layers to any project. 

After I did my stamping, I tore strips of paper as well as corrugated cardboard and and adhered them mostly where my focal point was going to be but also in a few varied places. Then I added some molding paste using 2 different stencils.  I also added in some Creative Embellishments chipboard as additional layers. Before adding my florals and bling, I created some micro-bead drips using narrow strands of Glossy Accents. Additionally, I used a flat spray fixative and scattered micro-beads all over the canvas. 


Here is another view of the Powdered antique wall stamp and the French script poem stamp
Some yummy Prima and Petaloo and I called it done. At least after one more run around the edges with my gelatos!  Then it was done! 

Thanks again to Something Tattered for having me today! It was such a pleasure. 


Something Tattered supplies:
Powdered antique wall stamp
C-est vous chandelier stamp
French script poem stamp

Creative Embellishments chipboard:
Photo/page Corner
Flourish Set 5
Oval Frame

Other supplies:

Prima Something Blue paper collection
Prima Tatiana blooms, ocean
Prima Tatiana blooms, coral
Liquitex Gesso, white
Lindy's Stamp Gang, Kissin Kenicke Coral
Lindy's Stamp Gang, Steampunk Sepia
Heidi Swapp Color Shine, Charteuse
Heidi Swapp Color Shine, Teal
Faber-Castell gelatos:
peach
metaillic mint
pistachio
silver ice
Petaloo mixed textured blooms, Teal
Petaloo burlap blossoms, Ivory
Prima shabby chic resin butterfly
Prima Say it in Crystals pearl leaves
Prima Junkyard Findings, bulb
Recollections microbeads, Ocean
The Crafters Workshop tile textures stencil, 12x12 and 6x6
Golden molding paste
Stazon, black
Quick Quotes Powder Puff Chalk Ink, biscotti, baja blue, mango mai tai

Tuesday, April 15, 2014

Sketchabilities Reveal # 113


Happy Tuesday, everyone! I hope you have your taxes done and that you are ready for a little creative time! It's Reveal Day over at Sketchabilities and we are unveiling sketch # 113 by the fabulous Karan Gerber! I think this is one of my fave sketches since my term began .. but indeed, I do love them all. 

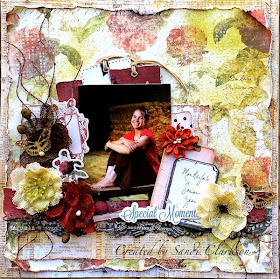
Today's layout is extra special to me because I've used a photo of my mom and my aunt Fonsene from 1951. I consider myself so fortunate to have so many family photos from days gone by. My mom had a large photo album with so many wonderful photos in it. Of course, she had many others in photo sleeves. But I loved looking through that old album with it's black pages and little photo corners. Even after it began falling apart, it touched my heart in a special way .. telling me the importance of family and friends .. and even more that you need to document that as a blessing to your children.  Scrapping has become an art form for me but I need to remember how my pages can bless my children and grandchildren, reassuring them how important they are. Even my husband feels important when he sees that I've scrapped him! 

Here in the upper right corner you can see some of the stenciling (Prima) I did with molding paste and Lindy's Stamp Gang mist. I adore some of Prima's newer vines and used them here.  There is also some stenciling in the lower left corner. I've used a Creative Embellishments Grunge music note border stamp  in the upper left corner (see first photo.) And it just so happens that Creative Embellishments is sponsoring Sketchabilities for this Reveal. Hop on over there for all the details! 


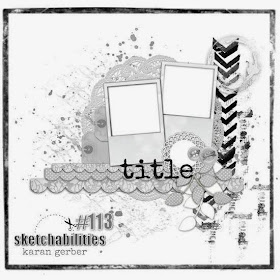
If you look really hard, you can see my Prima stitching stamp under the vine. I followed along fairly closely to the sketch this time although I did use a notecard in place of a second photo.  A little punching and distressing were perfect for this sketch! There are so many ways you could go with this one though. 


Here is the sketch for this time! You will have until the 28th to get this one uploaded. Can't wait to see what you create! Don't forget that Creative Embellishments is sponsoring Sketchabilities for this Reveal. Hop on over there for all the details! 


Many thanks for coming by.
 I always love reading your sweet comments! 

Monday, April 14, 2014

Creative Embellishments "girly" card project


Happy Monday, everyone! Hope your week is off to a good start!
 And that there will be some creative time for you! 
Whether you are a scrapper, card maker or altered project lover, Creative Embellishments has a lot to offer all kinds of crafters. 

I don't make too many cards but when I get in the mood to do a little something, cards are a perfect choice! I can have fun playing with paper, flowers, paints … and chipboard! 

Since I was needing to send out a girly card, I grabbed some awesome pink Fabscraps Marie Antoinette papers that I'd been hoarding. Then I used some of my Spellbinders dies (Classic Oval and Floral Oval) for the center 2 pieces and a Verve stamp (Brighter Days) for my sentiment.  All the papers were inked with Rangers Distress Ink in Worn Lipstick and then sprinkled with some Lindy's Stamp Gang mist in Bougainvillea Fuchsia as well as just a touch of molding paste stamped on with some bubble wrap for texture. These were all layered along with a paper doily from my stash as well as some Zva bling that I've had for awhile. 

My Ivy Spray was cut in half and then altered. If you are anything like me, once you start altering you kind of loose yourself in your project and keep trying multiple things until you get exactly the look you're going for. Sound familiar? But basically I gessoed my Ivy and then used Lindy's Stamp Gang's Rusty Lantern Lime and highlighted with Ranger's Distress Ink in Peeled Paint. My veins were created with a bit of green Smooch and Tattered Angels Glimmer Glam in Dirty Martini. I finished off everything on the card with a touch of white gesso applied with my finger and the Ivy was no exception. I like the nice circle I got in a few random places. 


I then added my flowers which were a mix of Prima along with some Iamroses roses. The pinks and purples were used to pull the colors from the paper and look really nice together.  I tucked in a sweet bow using some feathered twine from my stash. 

Of course, I had to finish things off with a butterfly! I choose one from the Butterflies, 7 pieces set and altered  it very simply .. with some white gesso and Glossy Accents.  While the Glossy Accents was still wet, I dropped some purple micro-beads from Michaels onto the butterfly.  I planned to use a pearl in the center of the body but decided it looked fine as it was! My last step was randomly applying gesso to everything for a uniform look. 


Before I go, I thought I'd share a couple of close-ups for you:


That's it from me today! Thanks so much for coming by the Blog. Be sure and check out the Creative Embellishments Store and see what's new! 


Wednesday, April 9, 2014

Design Team Call!

Have you seen the Sketchabilities Design Team Call
Only one more day to get those applications in! Karan's sketch's are awesome and so is she, so why not give it try? 
Good luck! 

Monday, April 7, 2014

My Creative Scrapbook Reveal #2


Hello, there everyone! I'm back today with a few more creations using my April My Creative Scrapbook Limited Edition Kit.  Since it was a Spring kit, I decided to use it in a nontraditional but soft way, so a vintage-y Winter page seemed to be the ticket! 

I've chosen more of the neutrals and paler embellishments to complete this one. Just some cheesecloth and lots of wet mediums form my stash complete the look. This one will be part of a tutorial I'll be sharing later this month on the My Creative Scrapbook Blog but I went a little crazy with gesso, molding paste, crackle paint and Sno-Tex.  I found my little image in my Vintage folder on my computer but I think it was downloaded from Graphics Fairy originally. 

Close-ups:


***

Next up, I have a fun card for you! 


Another great vintage photo find on my computer that I printed out to be the "focus" of the card. And I used the red polka dot vellum from the Kit along with some red card stock to create a fab flower using my Rose Creations die from Spellbinders.  Then I just started grabbing scraps and fun embellishments from he Kit. 


The stamen was pulled from one of the Kit flowers to help create my flower. 

***


I'm not as happy with this one but I made it for a sweet granddaughter who just turned 5. I thought the darling little plastic bows would be so perfect for her. I sewed a center "pocket" on the card with more of the red polka dot vellum and then dropped a bunch of the red sequins from Studio Calico inside. That fab doily was fussy cut from one of the Styleboard papers. And my report card from the granddaughter was an A+.  She is proudly displaying her card and showing it to her friends! You'll note that I've used the green floral paper more than a few times this Reveal. It is just the "bees knees!" 

  I think my May My Creative Scrapbook Kit is on it's way and I can't wait to get started!! 

Thanks for coming by again today!


Saturday, April 5, 2014

Exciting Design Team News!!! Reveal post #1


I am over the moon excited and so glad to finally share that I've been invited to join the My Creative Scrapbook Kit Design Team, specializing in the Limited Edition Kit. Whew! I've been sitting on that news for a  while now … and it feels so good to finally be able to share! My Creative Scrapbook has Main Kits, Creative Kits, Album Kits, the Limited Edition Kit as well as Flower add-ons Kits, Mixed Media  Kits, Off the Page Kits and Project Life Kits. A little bit of something for everyone! 

And … It is Reveal Day at My Creative Scrapbook and I'm ready to share a few of my April creations. Pam decided to shake things up a bit this month! Our Limited Edition Kit is full to the brim with lots of yummy Crate Paper Styleboard and Oh Darling papers along with the most adorable Oh Darling embellishments from Crate Paper and Studio Calico. And she didn't forget our Prima! It was so hard deciding whether to go CAS or with my normal shabby, romantic style, so I did a bit of both! The great thing about working with something outside your norm is that it really gets those creative juices flowing! I still have ideas that I didn't even have a chance to get done! 

As you can see on the photo above, these papers are perfect for distressing! Lots of cute little embellies here and a cluster of butterflies are so perfect for the fun mood of the photo. 

Here are a couple of close-ups of LO #1:


***
Next I decided to go with a CAS yet layered look and am so happy with this one! I've added no wet medium just some dry brushing with white gesso.  It's actually probably my fave page of the Reveal! 


And here are your close-ups:


***
Lastly for today, I'm sharing a shabby, romantic page.  Isn't it amazing all the looks you can get with one kit! 


For this one, I've used a a stencil and some mists from my stash as well as lots of gesso, stamping and fussy cutting.  I love the bright pops of color that I've paired with the teal background. 

And some close-ups:


I'll be back in a couple of days and share another LO as well as a couple of cards that I created using the April Limited Edition Kit. I still have lots of product left, so you can get a lot done with just one kit! 


Here's a photo of our fun and fabulous April Limited Edition Kit. 

To see more April creations visit the Design Team Gallery and see what the designers have done using the various Kits! You can also get a peek at Monday's projects! LOL

Thanks for coming by! See you in a couple of days!