Pages

Wednesday, September 26, 2018

How Strong You Are ~ Creative Embellishments with Sandi Clarkson

Hello,  scrappy friends! 
Time to share another Design Team project for my much loved Creative Embellishments

Since Fall is finally headed this way in my part of the world, I find myself really gravitating to the warmer color schemes ... which are kind of my faves anyway! And with that sometimes comes a little Steampunk vibe. 


I had recently been inspired by a black and white photo I saw on Instagram of a strong lion accompanied by a Bob Marley mantra. Funny how little things can inspire us as crafters. 

From that, I got the notion to create a Lion of my very own by using the Steampunk Cat and 2 or 3 packages of Feathers, set of 5. For a base I've used one of the large 10 inch tags from the Large Tags, set of 3. Now mind you, I had to order some of these pieces ahead of time and wait for them to arrive ... so I've been sitting on this idea for awhile. 

Here is that inspiration photo:


Anyway, I got busy on my background of my large tag and used some crackle paste which I allowed to dry overnight. Then I used the Ivy Stencil and pushed some Shimmerz Patina Texture through it, After that dried, I set about adding about 14 colors of Shimmerz products that had recently arrived. 


The next step was treating my chipboard with walnut ink and beginning the assembling of the lion's "mane" by adding feathers around the face of the cat. After a while, I decided this was the craziest notion that I have ever had ... and almost trashed this poor little guy numerous times.

But I  just kept pushing though and am so glad that I did. I adore him now!


Here's a close-up of the "mane" which I just added around the face of the Steampunk Cat and stacked as needed for dimension. When looking for a ribbon for the top of my tag, I found this cool eyelash trim from years ago and snagged it to add more texture to the mane.
Of course, then  I started adding some highlights and lowlights with acrylic paints, gesso and walnut ink. There is a bit of Cinammon Stickles here and there.


And a view from the side.
Isn't he grand?


And here is a quick pic that I took outdoors. 

I hope this will inspire you to think outside the box and get creative! It can be so rewarding.

Thanks to all of you who were able to participate in our 5th birthday Crop! So fun!

There are still a few days to play along with our September challenge and hopefully win a $50 voucher to the Creative Embellishments store! Here is a link to the Challenge.

See you soon!
Sandi
Creative Embellishments products used:
Chipboard:
Stencil:

Tuesday, September 18, 2018

Fall Tags for Shimmerz Paints

Hello, Shimmerz Paints fans! 

Sandi here with you today sharing a couple of Fall tags that I created one rainy morning here in Texas. 


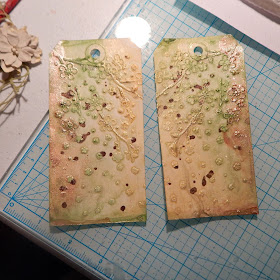
These were my finished tags which started out as regular old office supply tags. 
I primed them with white gesso and after allowing that to dry, I added some texture with super heavy gesso and a stencil. 
Then I applied water and misted them with  Glorious Day Vibez,  Palm Reader Vibez and then added the new So Sappy Shimmerz with a paint brush allowing the colors to run in a downward pattern. I reversed the order on the second tag, so they are mirror images. To add more depth, I splattered some Hot Fudge Vibez.


Here they are before the embellishments were added. Look at that Shimmer! 


After the color was dry,  I added some punchinello ribbon beneath the florals, a couple of wee buttons and then a couple of chipboard Autumn Set title pieces from Creative Embellishments which were darkened with Chocolate Brownie Coloringz

Some various ribbon at the top completed them. I'm so happy how they turned out. 


This photo shows the top portion of the card a bit better. 


Just another shot at all that Fall color! 

Don't forget to include my name "Sandi" on your retail order. Stacey will send you a free little goodie! How fun! 

Thanks for coming by. 
See you next time! 


Shimmerz Paints products used:

Wednesday, September 12, 2018

#Happy layout with Sandi Clarkson

Hello, scrappy friends! 

I'm here with you today sharing a layout of little baby Joel. 
He has been quite ill and this is the first time I have dared to scrap him. 
Such a sweet photo! 
This was created as a Design Team project for Creative Embellishments and Shimmerz Paints. 


I wanted to highlight the new Shimmerz Ahoy Matey Coloringz, so I chose a Creative Embellishments chipboard panel layering piece the Hearts Panel and a #HAPPY title from the Social Hash Tags set to do just that! I've saturated both pieces with the Ahoy Matey which is a great Navy color, yum! And just to define it a bit better, I added just a hint of navy blue embossing powder in a few places.


Here is a close-up of the panel piece. You can also see my splatters of Glorious Day Vibez and Jeni B Bleu Vibez.  Not to mention that stamping I've done with the Distressed Text Stamp.  I've also included some of the Spigelmom Scraps Sequins Boymomlife sequins.  So perfect for a boy page!


Here is, of course, the title piece and the bottom ridge of the Heart Panel. Once again you can see the great Vibez colors as well as the sequins and the Distressed Text Stamp.


I'm notorious for adding flowers to my boy pages especially when they are still little like this, haha!


One last close-up to show the dimension as well as that awesome Creative Embellishments Shine Flair Gold that I've tucked in there.

Creative Embellishments
Chipboard:

Saturday, September 1, 2018

Victorian Steampunk TN ~ Creative Embellishments!

Hey, hey! 
It's time for the September Challenge at Creative Embellishments
Where does the time go?


I'm excited to share my take on the Inspiration Photo ... my take was to go Steampunk and play with some of the awesome Steampunk chipboard pieces that Nicolle has in the store.

This is an altered Travelers journal and I adore how it turned out!!
I've used the Steampunk Hot Air BalloonSteampunk Goggles and the Gears Set.
For the "something found" twist, I've used some small embellishments that I found in my scrappy junk drawers and was tickled to finally use, especially that wee suitcase and the gorgeous aqua drawer knob!

Here are some close-ups:


The Steampunk Hot Air Balloon was my primary layering piece. It was inked with Walnut Spray and then hit with some patina rust paste and sprinkled with aged gold embossing powder. I've added the little matching clock hands and a few gears from the Gears Set. Under my photo is a torn crochet doily. It adds more of a Victorian Steampunk vibe.


Next I took the 3 googles from the Steampunk Goggles and altered them the same as the balloon but layered them at the end. I thought it added some cool texture. Everything got a touch of white gesso at the end.


This is just a dimensional view.


And one from the other side.


Here is that fab drawer pull which was part of something found twist.


And one last photo of the journal!

Can't wait to see how the photo inspires YOU!
Here it is:


Creative Embellishments Products used:
See you next time! 
Sandi