Pages

Friday, January 25, 2019

"Hold On Me" ~ Creative Embellishments Oversized Tag

Hello, everyone! 
Sandi Clarkson here with you today! 

I'm back with an uber-embellished,  feminine oversized Tag! These great CE Large Tag pieces are approximately 5.5w x 10h ... providing plenty of surface to create whatever you want! In fact, I've added 7 different Creative Embellishments products to this single tag. 


Since it's getting close to Valentine's Day, I was in the mood for pink. Now, if you know my work at all, you probably recognize that I'm more of a peach or coral kind of gal. But today I went pink and flowery all the way.


I started by selecting my papers and trimming them to fit one of the Large Tags.  Next I added a layer of crackle paste and set it aside to air dry. While I was waiting, I figured out my design and then altered all my remaining chipboard with walnut ink. Also, I did some "sprinkle" embossing here and there with some aged gold embossing powder. 

When my tag was finally dry and it had some crackle, I did some random stamping (see photo above)  with the Circle Bokeh Stamp and the Distressed Crackle Stamp and black ink. I also did a bit of misting to restore some of color I had lost by covering the paper with the crackle paste. 


Here's a good view of some of the Baby's Breath along with the Large Clock Face 6 inch and one of the Clock Hands


The remainder of the Baby's Breath was tucked in here on the bottom left. 


I adore the CE Large Clock Face 6 inch which actually comes in several sizes. 
Here it is used as one of my base layers but I made sure to let it peek out here and there! 
I've been itching to use some of my pink mica flakes which you can see here. They are so shiny! 
You'll note one of the Seasons Change Flair right under the top of the purple flower. It was the perfect embellishment to use. 


This is another dimensional view to help convey how large this lags really are.


I'm not sure why I love this blurry photo but I do. Probably because I finally, finally used some super large and very old Prima flowers that have been in my stash waiting for the right project to come along!

That's it for me today!
I've linked all my products used for you below.
See you next time!


Creative Embellishments products used:
Chipboard:
Stamps:

Wednesday, January 23, 2019

By the Fire ~ Altered Control Board for Shimmerz Paints!

Hey, hey, Shimmerz Paints fans! 
Sandi Clarkson here with you today sharing my latest project .. an altered furnace control board! 

The back story here is that our heat went out late Christmas Eve and was not restored until January 2nd! It was a very long, miserable week to say the least. So, when the repairmen handed me this burned out control board, I knew I had to alter it and memorialize that we survived! Thank goodness for electricity and that Lowe's had plenty of space heaters. 


The second back story is that when I get a new shipment of product from Shimmerz, I always open it as soon as I possibly can and sit down and spray (or brush) them all out on the "nearest to me" sheet of white paper! Maybe even a paper towel. So, I wanted my project to sort of replicate that habit. Since rainbow patterns are popular in crafting, I went with that! 


My first step was to paint the control board white using some glass bead texture paste. Once that was dry, I began to spray from left to right.  My colors used were the following:


To amp up that glorious texture created by the object itself, I added some like-colored glass beads here and there.
Then I added my flower and mechanical light bulb.


Here's another angle of what and my hubby and I are calling our little city! Haha!


My title is from 7 Dots and is sort of another tongue in cheek gimmick!
Yes, I am trying to make the best of our adventure.
It could have been soooo much worse!


Here you can see the netting I added under the florals.
The chicken wire is solely for photographing.


Trying to show you a close-up of the beads.


One last photo and I guess I'm done!
I hope you are inspired. 

This was one of those fun, cathartic projects.
Just aim and spray to your hearts content!
Loving my Shimmerz Paints!

Remember if you place an order, use the code SANDI for a free paint.


Products used:
Coloringz Scarletts Fever

Friday, January 11, 2019

I Love You ~ Altered Embroidery Hoop with Creative Embellishments!

Hello,  Creative Embellishments fans! 
So, who is already making Valentines projects? 
Not me normally but ... the Creative Embellishments store is too full of heart shapes galore, wonderful LOVE chippys and all things Valentines! How could I resist? 

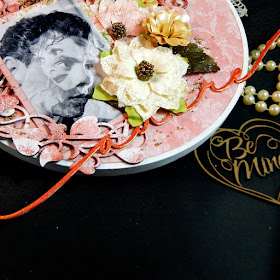
Sandi Clarkson here with you today sharing an Altered Embroidery Hoop .. sweetheart style. 


A while back I came across this cool double exposure photo of Lucille Ball and Desi Arnaz and pulled it out for this project!
 I was intending to use the hoop as a sort of reverse canvas but decided to go the  easier route this time and embellish over paper. 


I knew I wanted to stay with a pink and red theme, so I chose my chipboard pieces and decided to make the hearts pink and the words red. So firstly, I decided on my placements and then I stopped and altered the actual chipboard. Both of the hearts from the Heart Flourish Frame 2 were prepped and then misted with an older mist color that is no longer available. Then they were lightly dabbed with chalk ink and lastly with white gesso. I layered then up as you can see here. While that was drying, I cut my paper circle and then painted the hoop with white paint. 


Next is a fun side view of the project to show you the dimension. You will note that the hearts hang slightly off to the side of the project. I attached them so that I can actually remove this photo and add others as desired. 


Here is a close view of those hearts. Loved them so much that I used both of the frames! 


The Valentine Word Hearts are sooo cool! Since I had decided to add just one, I of course went with the I Love You piece and heat embossed it red. There are some other great choices in the set! 


I was also itching to use this Adore piece from the Family Word Border Set. It was heat embossed in red as well. 


My last step was to add some florals and other embellishments including my much loved and now used all up 13 Arts gold microspheres! A tulle bow at the top finishes it up! 
I hope you like or are inspired to create something of your own. 

For a little retail therapy, please visit the CE store at Creative Embellishments
Wishing you a creative year! 

Sandi


Creative Embellishments products used: 

Wednesday, January 9, 2019

"Explore" mixed media layout with Shimmerz Paints!

Hello, scrappy friends! 

Sandi  here with you today sharing my first Shimmerz Paint project for 2019! 
Here's hoping for a creative year for all of you!!! 


My first step after selecting my papers was to coat them with clear gesso and then added Paste-Eez Salt of the Earth texture paste pushed through a stencil. 

After that dried, I added my distressed photo layers along with the photo of my grandson. Before moving on, I did some random stamping with several different stamps. 


After choosing some chipboard embellishments from Creative Embellishments, I prepared them in a couple of different ways.

This Twig frame with fall leaves was sprayed with my Shimmerz Coloringz Chocolate Brownie.

After that dried, I sprayed the frame and leaves with my Shimmerz Vibez Hot Fudge which gave them a warm glow!


Before adding my florals and other embellishments, I enhanced my focal area by painting on Coloringz Well Blue Me Down with a small brush.

As I worked, I keep some water nearby so that I could dilute and let the color run as desired. 


The chipboard title piece is from Creative Embellishments Adventure Word Set.

I decided to alter it a bit differently and chose my Inklingz Penny 4 Your Thoughts which turned out great! It gave it a nice, copper-y look.

In the background, you can see the Paste-Eez Salt of the Earth which was pushed through a stencil.


Here I tried to capture a better view of those copper tones of the Inklingz Penny 4 Your Thoughts.


The leaves were treated with a smattering of Blingz Gold Glimmer along the vein lines.

Finally, I added my florals and bling. Then splattered with gesso as well as Coloringz Night Moves which is black and the primary project color Coloringz Well Blue Me Down.


Thanks so much for coming by today!
Be sure to mention my name if you do a little retail shopping at Shimmerz for a little free paint.


Shimmerz products used:
Coloringz Chocolate Brownie
Coloringz Well Blue Me Down
Coloringz Night Moves
Vibez Hot Fudge
Paste-Eez Salt of the Earth
Inklingz Penny 4 Your Thoughts
Blingz Gold Glimmer
(discontinued Spigelmom Scraps sequins Boy Mom Life)

Creative Embellishments products used:

Tuesday, January 1, 2019

Creative Embellishments January Challenge!


Happy New Year! 
Welcome to 2019, everyone!

I'm here with you today sharing my take on the January 2019 Creative Embellishments Challenge. 

I was inspired by the soft pastels in the Challenge image along with all the seasonal photos which spoke "transition" to me.  I usually take my Christmas tree down on New Years Day, thus I went with a New Years card and tag set. 


This is my first ever teepee (pyramid) card but certainly not my last! They are so addicting! 
For the snow twist, I added some textured Glitter Snow and paint splattering. Creative Embellishments chipboard used were Pine cone clusters,  Antlers,  Berry frame 4 and the Holiday Sentiment Words.  

Here are some close-up details:


Creative Embellishments products use:
Chipboard:
Pine cone clusters
Holiday Sentiment Words

And here is the inspiration photo:


I hope that you can find time to play along as well!

Sandi