Pages

Sunday, June 30, 2019

Design Team Announcement


Finally I can share my great news!

I'm humbled beyond measure to share that I'll be returning for yet another term at Creative Embellishments! They are my dream team and I just can't get enough! 

 I have already received my July and August DT package and as always am blown away at the quality and precision detail on these awesome products. Who doesn't love using chipboard???  CE also creates wood veneer,  rubber stamps, stencils and flair. 


Here is a little bit about Creative Embellishments:

"Creative Embellishments is a new family owned company that was created by Michael and Nicolle Kramer. We are a husband and wife team who design and manufacture unique, high quality chipboard, wood and rubber stamp products. It is our mission to offer fun and inspiring products to bring out your inner creativity that you can add to any project. In the near future we will be expanding into other mediums such as rubber/acrylic stamps and acrylic embellishments."


So, stay tuned for more fun projects coming up very soon.  
And please visit the CE Blog to see what's going on right now!!! 

Because tomorrow is July1st, the July challenge will be posted then. 
Hope you can play along! 

So stay tuned here as well ... for all the close-ups.


Sandi


Wednesday, June 19, 2019

Sail Away ~ Oversized Tag with Creative Embellishments

Well, blow me down, mates! 
It's Sandi Clarkson here with you today sharing a fun oversized tag! 
All together there are 9 Creative Embellishments products on this one 10 inch tag. 


I covered one of my Large Tags, 10 inch with paper from 13 Arts and then prepped it with some clear gesso before pushing some black 13 Arts gesso through the Star Bokeh Stencil. While the gesso was drying, I altered my chipboard pieces by misting with some various 13 Arts colors. 

When those were ready I layered on my Fishnet Panel 2 on the center of the tag and added a white crochet doily for texture. I mounted my photo of my Dad and his friend on some co-ordinating paper and corrugated cardboard. I then added the Infinite Circle Frame 6 inch. On the right side of the circle, I layered the fabulous Nautical Corner


Next, I filled in under the photo area with some decorative roots and added a few florals here and there. When placing the flowers on the left, I added one anchor from the Wood-veneer Anchor Set of 6


Since I was still needing a title, I added the Sail Away Flair button from the Sail Away Flair pack. From there it was just a matter of playing with my colors, adding some chunky glitter and wrapping up with some white gesso. 


Here is a good view of the stenciling. 


A side view of several layers of chipboard! 
I love layering my chipboard pieces to create unique designs. 


At the last minute I decided to add my Dad's nickname "Red" to the top of my tag using the Typewriter Keys which were altered with 13 Arts Brown water ink and white gesso.Lastly, I added some ribbons to the top of the tag. 

That's about it for me today. 
I hope you've had a chance to play along with our June Challenge for a chance to win a $50 gift certificate to the store. 

Thanks for dropping by! 


Creative Embellishments products used:  

Chipboard:

Flair:

Stencil:

Stamp:

Wood Veneer:

Thursday, June 13, 2019

Memories ~ Nostalgic Mixed Media Layout With Sandi

Hello, 13 Arts fans! 

Sandi here with you today sharing a layout I created focused around an old photo of my uncle and I at my grandparents farm. I was a city girl (still am) and had great respect for all their animals.  Respect and fear, LOL. I still remember being afraid this old Bossy cow was going to trample all over me. But it made for a great photo opportunity for my mother! 


Anyway, my intention was to stick with some green to represent the fields where we stood along with some blue for the sky and then lots of browns, amber and so forth to represent the cow. However, as I played around with my paints, I decided to throw in some pink to represent myself. 


Here is a little collage of photos showing you the layout before I added my embellishments and photo. I firstly primed my Paper Blue Nights ~ Blue Magnolia with Clear Gesso and then covered 3/4 of the paper with a mix of White Gesso and MAGIC Powder to achieve a bit of crackle. I allowed that too dry overnight before proceeding. I did some random stamping with the Numbers Stamp  and then some stenciling with the script portion of the Dandelions Stencil and some Modeling Paste.

All my paint colors are all listed below in products used but are comprised of mostly some Rainbow powders, Ayeeda Water Ink and some Splash products. 


While my paints were drying, I altered the large clock chipboard from Chipboard HIS HERS Remastered with Rainbow Color Brown and the leaves from the Chipboard Set Vintage Summer A4 with the Olive Green Ayeeda Ink. The title piece was left bare and is included in the Rose Fields Chipboard Set 12x12.

I layered my photo on torn and distressed pieces of the Paper Postcards ~ Blue Magnolia and matted my photo with BLUE MAGNOLIA A4 Butterfly collage. The little colorful scrap under the clock was my original test scrap of paper and I decided to include it for interest.


Before adhering the focal area, I added some Sisal ecru for texture and a few fussy cut florals from BLUE MAGNOLIA A4 Butterfly collage as well as some three dimensional flowers. I tucked in a paper doily and scrap of leaves from my stash. Since this was an outdoor scene, I included the bees from Metal Insects and a fussy cut butterfly also from BLUE MAGNOLIA A4 Butterfly collage.


I finished off with some paint splattering, dabs of watered down white gesso and some of the SPLASH Old Gold Glitter Ink and 13 Arts SPLASH White Ayeeda Ink.


Here you can see a little of the crackle I was trying to achieve.
This project got a little more colorful than I intended but my husband says he likes it and I hope that you will as well.

13 Arts Products used: 
Clear Gesso

Thank you so much for coming by the blog today!
I hope you will be inspired to create.
See you next time!


Monday, June 10, 2019

Fathers Day Cards ~ Creative Embellishments

Hello, Everyone! 
Sandi  here with you today sharing a couple of masculine cards. 
I'll admit that they are usually my hardest ones to create! 
But this year ... Creative Embellishments has made my Father's Day card creating and giving SO much easier! 

Here's the first one ... created with some Graphic 45 French Country scraps.


I've recently received my order of some of the new Shaker Sets that Nicolle has created! 
Whew, these make shaker cards an absolute breeze now .. all the height you need plus no scrambling for some acetate. There are extra pieces to allow room for your embellies plus the acrylic cover, wow! 

Here I've used the Circle Shaker Set which I stained with walnut ink. I was ready to go black if I needed to but my chipboard stood out like a champ! I filled my shaker with some sequins, beads and buttons from Buttons and More. They had been recommended by fellow teammate Jen Snyder, so I ordered and was more than pleased! These bits and bobs are from the Safari Sunset which I will use a ton, I'm sure. 


To give my circle shaker a bit more punch, I added a wheat stalk from the Wheat Set and basically colored it like a cattail instead. Worked great for my purposes. And although I'm not a Stickles girl, I added just a bit to my wheat for dimension. 


My sentiment phrase was cut from G45's Place in Time collection. and helped finish off my card! I'm over the moon excited about this one and plan to give it to my husband. Shhhhh! Its still a secret! He is accustomed to all kinds of handmade cards from me but I think this will be his first Shaker! 
Shake, shake, shake! 


***

Up next is another masculine card that can go for numerous occasions. 
In fact, this one was done for our pastor who just celebrated a 20 year stint with our congregation. 
He is a really cool guy, funny as all heck but a powerful leader and example. 


This time I switched to 13 Arts for my papers and used some Amour which I stamped with the Distressed Moroccan Stamp. After adhering my papers and stamping them, I altered my Music Artist Trading Coins and title words with walnut ink. 


The Artist Trading Coins are my absolute fave to use right now! They are prefect for so many kins of projects but make cards a breeze! Here I added some sisal and a flower and was basically done! 

The Great Job sentiment comes from Small Sentiment Words and was perfect for this Congrats card. However, wouldn't this be just as perfect for Father's Day? 

In fact, my guy has a birthday right after Father's Day, so I'm off to make another card! 

See you next time! 


Creative Embellishments products used: 


Saturday, June 1, 2019

Creative Embellishments June Challenge!

Hello, Creative Embellishments fans! 
It's time to reveal the June Challenge .. and what a great challenge image this one is! 
The twist is to add a banner. 

We hope that you will play along! You could win a $50 gift certificate to Creative Embellishments and load up on all your favorite chipboard, stamps, stencil or Flair. 


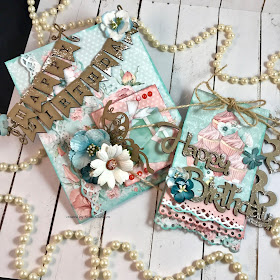
I was inspired by the overall happy them of the challenge image and decided to take this opportunity to create a card and tag set. I have a bazillion birthdays in June and July, so having plenty of cards on hand is an awesome thing! 

I've used this paper collection before but went a different route this time. It amps up the party theme and looks great with the chipboard in its raw, unaltered state. Just a dab of gesso at the end to blend! 


Here is the card which is fairly simple this time around. Just an added strip of punched paper and a square with gifts on it, some flowers and fluff! I layered my chippy banner pieces which are from the Happy Birthday Banner set. Aren't they fabulous?! For some added interest, I tucked in a half-butterfly from the Flourish Butterfly Set 2. Love these old teal Petaloo flowers that I can hardly find anymore. Perfect color and size. 


The tag is my usual triple layer, punched tag with some hearts layered in from the Heart Pieces set. Next I added the Happy Birthday phrase from the Birthday Word Set. Some floral, gesso and twine and all done! 


Here is a close-up of the banner itself which I layered together. Even though I left mine raw, it would be awesome if painted, inked or embossed. 


Lastly, a close-up of the half butterfly! Look at the dainty cuts! 

Here is the Challenge image: 


Creative Embellishments products used:

Thanks so much for stopping by! 
Can't wait to see what you create. 

Sandi