I am up on the Scrap That! Blog today with more details for my June Kit creations!
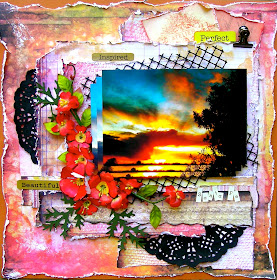
Although I didn't want my layouts to be too cliche, I thought this was the perfect opportunity to scrap some photos about a trip to Santa Fe last year (snagged from the Inn on the Alameda Blog to augment my own photos from the trip. I did a ton of paper layering and distressing on this one! Amy's great sketch is perfect for getting in lots of luscious layers. I painted my largest doily with some black paint to complement the darker color in my photo and then split it in half so that I could let it peek out in a couple of places.
You'll see that I hand crafted some one layer flowers that I've named the "Pueblo Rose." They are meant to loosely resemble the Scarlet Globe Mallow. I did a tutorial on them here last week. I've also added in some bits of a vintage Prima vine from my stash. I printed my photo 3 times and layered them for a more dramatic effect. Isn't the black mesh from the Kit a perfect backdrop?!
Here are a few close-ups:
_____
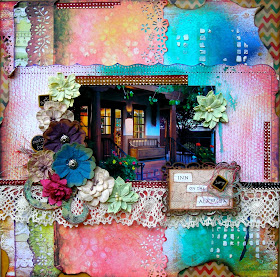
For my next project, I had some fun with my Lindy's Stamp Gang inks and let the colors drip as they wanted. So yummy and fun! After getting a general idea of how I wanted my page to look, I took to my favorite way to distress my papers .. FIRE! First, I must say that I only do this when the hubby is home, just to be on the safe side! One can never be too careful!!! I stand over the kitchen sink and use the flame of a candle on the edges and let it burn until I'm happy with the amount it has burned away. Then I blow the fire out. These papers wanted to smolder a bit longer than most, so I left my project on the counter for awhile after dampening the burned edges a tiny bit. You can see that I've used a few different punches (4) and once again some molding paste and my Tile Textures stencil. I'm counting 8 paper layers, how about you?
I also had fun with my chipboard flourish that I treated with Gesso, inks and a Prima Firefly stamp. I finished it off with Ranger's Clear Rock Candy Crackle paint. While arranging my flowers, I decided to add in a few wisps of sewing thread that was tangled up in my mending basket and used it there as well as on my Dusty Attic title chippy. (The title chippy and ecru lace are from my stash.) I finished up with wood buttons from the Kit as well as the Prima crystals which cut up and used in various place.
Close-ups:
______
Last but not least is a "softer" page that I really, really love. It is so pretty IRL. The photo is a night time view of Santa Fe that had great colors but in the long run I opted to convert it to black and white for a "frosty" look. I've done a few layers here as well and did a wet distressing technique with them. On the last layer, I've used some Lindy's Stamp Gang in Autumn Maple Crimson, then topped that with some molding paste and a Prima Donna Downey Poppies and Peonies stencil. While experimenting with my ribbon, I came up with this squiggly effect that reminded me of the mountains, so I decided it was a keeper and then added my pearls in fashion and adorned them both with my large blooms. The title chippy is a Blue Fern product that I inked and stained so many shades of brown that I lost track! =) It sure does shine though! I wanted that wintry look to my page, so the Dress it Up flats were perfect to for adding more shimmer. I tucked in the small doily from the Kit as well as some cheesecloth from my stash. My Maya Road butterflies were left untreated except for some Rub and Buff.
A few close-ups:
That's it for this time! Thanks for coming by!


.jpg)


WOW these are stunning layouts, the photos in the first two are amazing in the depth of color and also the use of the gorgeous colors on your layout too.. and love all the colors surrounding the b&w photo on the 3rd layout, and those zipper flowers are fabulous!!
ReplyDeleteWow!! You are amazing!! These are gorgeous! LOVING the colors and the layers!!
ReplyDeleteGorgeous and stunning layouts Sandi! Love all of the vibrant rich colors! Amazing details and texture! You really rocked the kit!!! Hope all is well with you.
ReplyDeleteOh Sandi these are amazing! I love the backgrounds and all your details. Such stunning work.
ReplyDeleteAll are Beautiful Sandi! looove the firs one!! and all the layers awesome work with the kit! xo
ReplyDelete