Sunday, March 30, 2014

Sketchabilities #112 Reveal!


Hello, Sketchabilities fans!

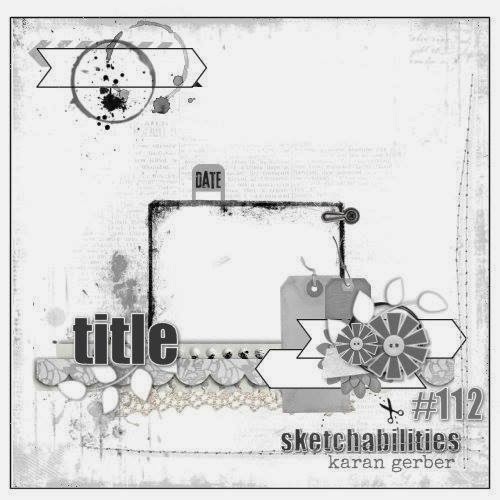
 Time for a new sketch challenge! Karan's sketches are always so divine and the perfect opportunity to get those scrappy hands moving! You will have until April 13th to link your work to the Sketchabilites blog and have a chance to be on the "featured" banner! 

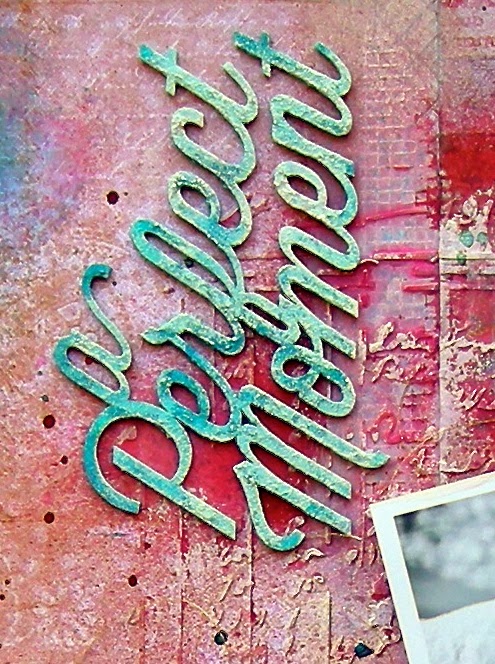
I had some new Prima Stationer's Desk paper and chipboard aong with a yummy Prima Rose stencil that I was itching to use! I think I got 6 new stencils as part of my after-CHA haul! Of course, I've also used a Creative Embellishments Flourish set 15 and added that to my floral cluster. It's been gessoed and inked, then embellished with a teeny, tiny bit of Burgundy Stickles. 


Some vintage Prima mixed with some new. I've had that Tiffany Petals Paired Platinum flower for yearssssss and finally had a chance to use the last one! Isn't it perfect for this page? I've nestled in a few Stationer's chipboard for additional layers.  Of course, when the page was nearly complete, everything got hit with a bit of gesso to blend all the elements together. 


The upper left corner shows a bit more of the Rose Stencil as well as a Creative Embellishments stamp that got covered up with molding paste … part of the process, I suppose!  It's called Grunge Music Note Border Stamp and you can find it HERE


Some punch work and ink splatters of LSG retired Ruby Red Slippers. 


Another view of that great Rose stencil. 

I've included Sketch #112 but I do hope that you will visit the Sketchabilities blog and see what the rest of the Design Team has done with the sketch! I loved working with this one! 


Thanks for coming by! See you soon! 

Sandi


Friday, March 28, 2014

~ We Are Family ~ SOUS and Creative Embellishments


Hello, everyone! Thanks for coming by! Today I have another layout, this time using a multi-photo sketch from  Stuck on U Sketches where I have been Guest Designing this month. Perfect opportunity to get some family photos scrapped that have been laying around toooo long! I was seriously tempted to scrap only one photo but .. having 3 kids, well I just decided to do all 3! Couldn't leave anyone out, could I? 

I wanted a very soft look to my page and have used Prima's new Princess papers along with some Prima and Petaloo .. yummy! So, first up, I did a bit of background work to my paper with my Tile Textures stencil and molding paste.  Added some color with a brush in Lindy's Grab a Guy Gold. The bonus was that my tray had a bit of residual copper paint in it and so I got some fab copper streaks that look awesome! 


But you're here to see the chipboard, right?!  Here's my first little guy which I've used as an element per the sketch but that also helps balance the left side of the page. I didn't want it to dominate at all, so I painted it with an Antique White acrylic paint and then lightly inked it with some Ranger's Distress Ink in Peeled Paint and Worn Lipstick. Later I dabbed a tiny bit of TA Glimmer Glam in Dirty Martini to a few spots. Then finished with a small dab of white gesso here and there. 


***


I love how my title pieces tuned out! I first applied white Gesso, then inked it with Ranger's Distress Ink in Rusty Hinge and randomly painted a few spots with Viva Precious Metal in bronze. For aging and variation, I've smeared on some Rub and Buff in Patina and then dabbed here and there with white gesso. 


***


I thought this Flourish would make a great corner piece and it did!! Again, I didn't want anything too brash or bright, so I took it easy and gessoed, then painted with Lindy's Green with Envy Green which I allowed to "pool" for variation in color. My Gelatos came in handy for adding some vein streaks to the leaves. Some random gesso and I called it done. (And it is SO hard for me to call these babies done 'cause I love seeing what one more change will do! Am I the only one???) 


***

Just a couple of close-ups of the rest of the page:


And here is that sketch from Stuck on U Sketches created by my good friend, Leah Schaeffer.  Hope you get a chance to play with them! 


Okay, time for me to close for the day! Please be sure and let me know if you have any questions! 

Now off you go to check out the Creative Embellishments Store!

Sandi

Thursday, March 27, 2014

BAP ~ As seen on the My Creative Scrapbook Blog today ….


Hello, everyone! I am so excited to be Guest Designing for My Creative Scrapbook this month using the gorgeous Limited Edition Kit! Being a huge fan of Pam's kits, this is quite the treat for me! 

I thought I would just share with you a little tutorial on how I've built the "Happily Ever After" layout. (Please excuse the color variations, as I just took quick photos as I went along.) 


1. Choose your paper selections and get a rough idea of which embellishments you think you'll use on your page.  I cut the center out of the floral paper and did a very quick fussy cutting of those gorgeous peonies.  The detailed cutting comes later! 


2. Using scissors cut a randomly curved edge on all 4 sides of your paper.  Then use chalk ink along your edges. 


3. Using any distressing tool or the edge of your scissors, distress all the way around.  A mini-mister is helpful to wet the edges slightly which will make them curl a bit more. 


4. Placed your striped paper on top of that floral paper.  Remember, the center has been cut away, so you'll be adhering those edges carefully.  I like to add a piece of plain card stock underneath to support my layers and embellies. 


5. Using a stencil (any kind) and molding paste, give your page some texture! I was a bit conservative on this page .. at least by my usual standards! 


6. Next add some color by misting and then adding water to make your color run. Tip the paper to allow your colors to really drip. Dab with a paper towel, then dry with your heat gun. You can also paint or sponge your color on depending on your mood, style  or project. 


7. Now it's time to do your detailed fussy cutting. Don't forget to ink those edges. I also used the stamp in the Kit and stamped directly on my fussy cut flowers.  While I was stamping, I went ahead and randomly stamped my background paper. I don't use a block, I just roll the stamping on. 


8. I like lots of dimension! So I've added some of the corrugated cardboard that the Kit was shipped in and have added that to those fussy cut flowers before adhering to the page. Cheaper and sturdier than foam squares! I do this ALL the time to give embellies and photos a little "boost." 


9. Next begin layering your elements! First the tag/notecards which have been cut from one of the papers, then those "boosted" fussy cut flowers and next your photo.  After that comes your flowers, chipboard, ribbon and  brads.  


This is the project when it was complete!
 Note how I've built up layers with flowers upon flowers … and ribbon with chipboard on top of that! 

This has been a long post but while you are here, let me share the other projects that I made using the My Creative Scrapbook Limited Edition Kit: 


Thanks for letting me share! 
And thanks again to Pam for having me as a Guest this month! It's been awesome! 


Monday, March 24, 2014

I'm a Berry 71 Bleu Guest Designer!


I'm so excited to be Guest Designing this month at Berry 71 Bleu. If you follow along, then you probably already know that the challenge this month has to do with "the luck of the Irish" hosted by scrappy friend Cathi O'Neill who lives in beautiful Ireland. 

You must design with:

Green (as a dominant color, doesn't have to be the only color!)
the word Lucky or Luck, 
and a bit of Irish lace (any bit of lace or doilies!)

As GDT I also had to add in a fabulous tag made by Marivic Clifton, owner of Berry 71 Bleu and Zeus and Zoe etsy shop as well as a piece of chipboard from sponsor Molossi.  Lastly (or so I thought, lol) , my project needed to include a doily. 

I haven't scrapped a photo of my oldest (our middle) daughter in a while, so I took this opportunity to do so.  She has a heart of gold and is a genuine blessing to all who know her.  How could I be so "lucky" as to be her mom? Not just lucky but blessed!

To create my background I've first done random stamping with my fave Inkido stamp and then used a new Prima stencil, molding paste, clear embossing powder and Lindy's Stamp Gang mists in Green with Envy Green and Rusty Lantern Green. The embossing got kind of lost after using my mists but the page does still have some "cool" sparkle to it. 


I had to show you a close-up of my chipboard title from Creative Embellishments.  It was inked with Ranger's Vintage Photo and heat embossed with Stampendous Detail Gold embossing powder, then flicked with white gesso. 


Just a clos-ie of the Molossi honeycomb chipboard which was gessoed and then lightly stamped with Green Tea chalk ink from Quick Quotes. Here you can also see the doily I've used along with a gold heart button that I removed from Marivic's tag and placed here to go with the "theme/title." 


Computerized journaling and a Prima Junkyard Finding that aptly says "Luck. "


This is a close-up of the tag that Marivic handmade. I was so tickled that it had one of my fave Manor House blooms on it! Plus it had some lace that goes along with the challenge theme! 


I am so into using cardboard on my layouts any chance I get, so I've tucked some here and dry brushed with white gesso. 

Thanks again to Marivic and Berry 71 Bleu for having me today as a March Guest Designer! This was such a fun challenge. I hope you have a chance to play along! 

Sandi


Saturday, March 15, 2014

Sketchabilities #111


Hello, Sketchabilties fans! Today I'm sharing my DT submission for sketch #111 over at Sketchabilities. I love, love, love this one! Circular frames around a photo get me every time. Karan creates the most awesome sketches, so I've included it at the end of this post. I'm sure you're going to want to play along, time permitting. 

I must say that this layout was probably the MOST fun, relaxing page I've created all year! Seriously, I created this one awhile back. Hubby was watching some playoff game and I was in my scrap room playing with pretty paper! Not a care in the world that day  .. just the joy of creating. 

I've used Marion Smith's Mad Tea Party papers, Prima blooms, a mix of chipboard and lots of cheesecloth tucked here and there. On the floral background, I've used a Prima crackle stencil and molding paste. Everything was finished off with gesso, crackle paint on the edges and droplets of Lindy's Ruby Red Slippers! 

Here's some close-ups:


Now, here's the sketch: 


I hope that you will head on over to Sketchabilities and check out what the Design Team has done this time. We'd love to have you! 

Thanks for coming by. Hope you're having a great weekend! 

Sandi

Friday, March 14, 2014

Stuck on U Sketches ~


Happy Friday! You know it's my favorite day of the week, right?
 Weekend's on the horizon - woohoo! 
And … it's Reveal Day over at Stuck on U Sketches

So what does that have to do with me? Well, I'm Guest Designing this month back at my old home base.  Earlier this year I thought I might be needing a little something to do (little did I know how busy I'd get) and I kind of  invited myself! LOL  But my girlfriends "took me in" and I'm tickled to be there! 

I've taken Leah's sketch for this time and flipped it .. 2 times to the left. 
I took great pains to select my paper, Prima's Delight collection and then promptly set about adding my wet mediums ... and covered it up! Oh, well! And of course, I'm using more wedding photos of the youngest daughter! 

I've used my 12x12 TCW ledger stencil, molding paste and Lindy's to create some interest to the page. Then prepped a couple of pieces of chipboard that had been languishing in the basket and used one for my border and the other as my title. Tucked in a few tags and flowers and called it done. 

Here's a couple of close-ups: 


And here is Leah's sketch: 


We hope that you can join in the fun at SOUS this time and create something of your own! You will have 2 weeks to upload your take on the sketch for a chance at some fun prizes. Be sure and head over to get all the details and to see what the DT has done this time around! You won't be disappointed. Here's the LINK

Thanks for coming by! 
Sandi 

Tuesday, March 11, 2014

Sandi's "Together" project!


Hello, crafty peeps! Sandi here with you today sharing a Creative Embellishments DT project that was just so much fun to do! I know that Christmas is long gone but I was itching to scrap this photo of 2 of my sweet granddaughters. The sweetie on the left was adopted last summer and it has been sooooooo hard to get a good photo of her! She is always in too big a hurry for photos! And of course, that is our little blond princess on the right. 


I wanted to share a few close-ups of the chipboard and how I've treated it. First up is that magnificent  Flourish from   Flourish Set #4.  I've treated this piece with Viva Crackle Paint in Gold and allowed it to dry naturally for the best crackle effect. Then I hit the edges with some Quick Quotes Powder Puff Chalk Ink in Mango Mai Tai. A single pearl to the center and it was done.


Next let's look at the flower cluster on the left and the fab feather from the  Feathers set.  I've been wanting to use one as a leaf-like embellishment for awhile!  I first gessoed the piece, then painted it with green acrylic paint before misting it with Lindy's Stamp Gang Rusty Lantern Lime.  The finishing touch was a few swipes of Tattered Angels Glimmer Glam in Dirty Martini. Love that stuff!


***


Here I wanted to share my simple treatment to the Together Frame set. Isn't it fabulous? And so trendy! It was so easy to alter with a bit of green acrylic paint, let it dry and then add some Lindy's Stamp Gang mist in Green with Envy Green. I love the splotchy effect it left. Just for a bit of detail, I added a few green pearls.


Then I got busy on my Butterflies. There is one on the right and another on the left side of the layout. Honestly, I added so many layers here that I sort of lost track! But what really changed the look was simple acrylic paint followed by more of that Glimmer Glam I love so much in Big Apple (right) and Dirty Martini (left).  Then a single pearl was added to the center.  The key to adding Glimmer Glam is to use a fan-shaped brush to scoop it out of the jar to ensure you get plenty of the glitter!


***


I adore the sweet Lamp post set! They are just the right touch to add to so many kinds of projects! For this one I first gessoed and then painted it black. Using some Versamark and  Stampendous Aged Gold embossing enamel, I achieved a nice look but decided to chip away part of the embossing enamel for a more aged look. 


***


That's about wraps it up for today! Just adding a little close-up of one corner of my page! 

Thanks for coming by today! I'll be back on the 28th with another project for you! There is something new here on our Blog every day! 

Be sure and visit the  Creative Embellishments store and take a look at all the new items! Something for everyone! 


Creative Embellishments supplies used:
Together frame set ..  Together Frame set
Feathers ..  Feathers
Flourish set #4 ..  Flourish Set #4
Lamp post … Lamp post
Butterflies …  Butterflies

Other supplies:
Graphic 45 Twelve Days of Christmas
Martha Stewart Wild Flowers Punch
Art Is stencil
Lindy's Stamp Gang Green with Envy Green
Lindy's Stamp Gang Rusty Lantern Lime
Stampendous Aged Gold Embossing Enamel
Viva Crackle Paint, Gold
Tattered Angel's Glimmer Glam, Dirty Martini,
Tattered Angel's Glimmer Glam, Big Apple
Distress Paint Dabber, Peeled Paint
Distress Paint Dabber, Red Pepper
Heidi Swapp Color Shine, Sweet Cherry
Sandi