Monday, March 22, 2021

Sweet Altered Birdhouse ~ Creative Embellishments

                                                Hello Creative Embellishments fans! 

Sandi here with you today sharing an altered MDF birdhouse that I had in my stash and had never assembled. I believe it was made by KaiserCraft and part of a Scraps of Elegance kit. 


First I assembled the pieces of the birdhouse and glued them together. Before adhering the front of the house, I painted the inside using white craft paint. Next I added the roof deck and then started layering the Hexagon Shingles. The shingles come in a 12 inch length, so I cut that in half to give me 2 sections. (There are 10 shingle lengths in a package.) I glued and painted almost simultaneously as I added the shingles. 


I do wish that I had added my texturing before I assembled my pieces because it was a little tricky adding the brick design afterwards.  I've used the awesome Crackled Brick Stencil along with super heavy gesso to create the brick effect.  After that was dry, I added color using my 13 Arts water inks. I had planned to use blue but then decided to that might look too wintry for a March project. 

For inks, I did a mix of Bordeaux and Violet. I painted it on and then misted it wth water to make it run. Also, I splattered some of the ink all over the house except for the roof. Later I splattered with watered down white paint. 


I rummaged through my Creative Embellishments stash until I found a small frame that I could paint and use around the opening in the front. I thought that finished it off nicely.  It is the Small Intricate Frames 2 set. 


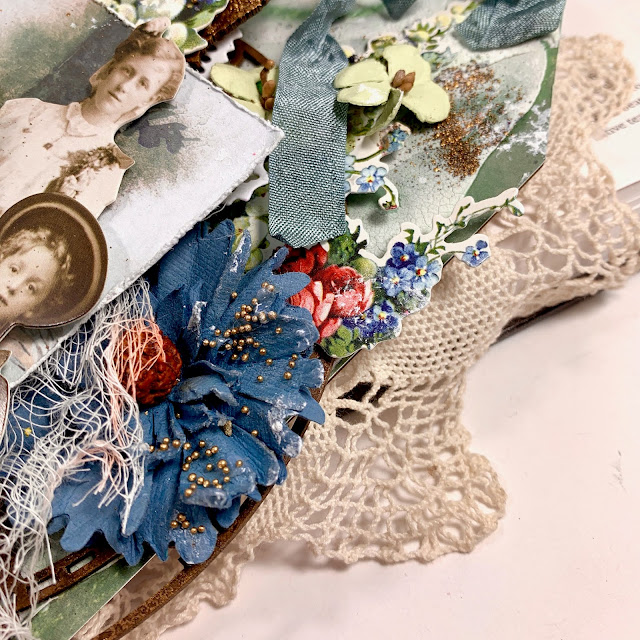
Then for textures I've added the purple moss over cheesecloth along with a few florals and pinecones. This project actually took quite a few hours before it was all said and done, since I had the assembly to do as well. But I will never look at it without remembering the Texas Snowmaggedon of 2021 and our 56 hours without power during frigid temperatures. That is really why I didn't go with Blue. Thank goodness we have a daughter who lives nearby and who had heat! 

Please enjoy all these close-up photos: 


And that's about it! 


Thanks for visiting the Blog today! 

See you next time. 


Sandi


Creative Embellishments products used: 

Chipboard:

Hexagon Shingles

Small Intricate Frames 2

Stencil:

Crackled Brick Stencil


Thursday, March 18, 2021

Mr Handsome DL sized cards for 13 Arts

 
Hello, 13 Arts fans! 
Sandi here with you today sharing my latest creation for 13 Arts! 
Today we are doing a group posting of projects created with the new Mr Handsome collection. 


I've been loving the DL sized slim cards for quite some time now. I finally found a DL sized die from Pink Fresh that has the stitching detail on them! Bought those puppies SO fast, you wouldn't believe it! 

I had planned to do a layout for the Mr Handsome post but I was also wanting to experiment with my new dies, so cards it is! One with mixed media, the other a little more CAS. 


I used one of the new Mr Handsome stencils along with modeling paste and highlighted it with Navy blue Water Ink. A bit of stamping of course! Then I dove into creating a WOW focal point with my papers and some embellishments, ie, flowers, chipboard, a metal pen nib and microbeads. 


To alter the chipboard gears, I used the 13 Arts Rusty Bronze powder applied with gel medium. Then I activated it with the Reagent. After they were good and dry, I added my florals and then the gears. For more oomph, I added more Rusty Bronze along with Reagent for a good rusting vibe. When everything was dry, I added some brown microbeads and a jute bow. 


On my second card, I decided to go a bit more simple although I did also do some stamping on this one as I did the first card. Other than that, no mixed media except to alter the florals. 


This was a matter of layering some the ephemera elements, adding the florals and a metal clock face. 


To make the cards a bit more cohesive, I added some rusting materials to these flowers as well and gave them a sprinkling of the brown microbeads. 

My man has gotten accustomed to seeing flowers on his cards, so we are all good there! 


Here are a few of the materials that I've used for this project. Everything is 13 Arts except for the 49 and Market flowers. 

Thanks so much for coming by today! 

I certainly appreciate your visit! 


Sandi


Friday, March 12, 2021

Vintage Tag for Creative Embellishments

Hello, Creative Embellishments fans! 
Sandi here with you sharing an Oversized tag!  
And by large, I mean approximately 5x10 inches. 
You can pack lots of goodies on these guys! 


I started by covering my tag from the Large Tags set with paper from the 13 Arts Dreamland collection! Next I added some modeling paste (combined with 13 Arts texture paste) in smooth swirls. This provided a light crackle effect and some areas for stamping. 

When the modeling paste was dry, I did some random stamping with the Circle Bokeh Stamp and black archival ink.


All my other chipboard pieces were stained with walnut ink so that I could later add some metallic highlights in gold. 

The Large Clock Face 6" peeks out on the left as a bottom layer to the focal elements.  The clock face comes in a variety of sizes but the 6 inch works great on my tag. 

My ephemera pieces are all from Tim Holtz's Botannical pack. The doll pieces are from the Paper Dolls pack. 


Under the focal piece, I layered in one of the Ornate Pieces 2. Because it was a tad longer than I wanted, I trimmed it in the middle and left the ends to peek out vertically. It was also brush with metallic accents and was embossed with Stampendous Aged Gold embossing powder. A few gold microbeads from 13 Arts were added strategically. 


I added a pretty blue seam binding bow at the top! 


I have a deep love for 13 Arts microbeads, so I've scattered them throughout the page, particularly on my 49 and Market flowers. 


One last view of the top right side! 
I'm calling that a wrap  .. although I had planned to include a Flair so that is on my list of to-dos for next time! 

Thanks for coming by! 


Creative Embellishments products used: 

Chipboard: 

Large Tags

Large Clock Face 6"

Ornate Pieces 2

Stamp:

Circle Bokeh Stamp


Wednesday, March 10, 2021

Born to Ride ~ 13 Arts Mixed Media Layout

 Hello, 13 Arts fans! 

Sandi here with you today sharing my most recent layout for 13 Arts.

I was so excited to receive my new Design Team parcel filled with the 4 new paper collections as well as some mixed media supplies. 

It was such a pleasure to play with these new products! 

I combined papers from the Young and Free collection along with a couple of the new Color Glows, Garnet and Smoky Quartz. The Smoky Quartz is so my jam and it pairs well with the Garnet. 


As usual I began with a layer of clear gesso followed by stenciling with modeling paste and the new stencil from Mr Handsome. Also,  as usual I forgot to do any stamping until the end! Such a bad habit! 

Next I added my Color Glows and pushed them with water. 
While that was drying, I began preparing my embellishments. 

I've used a photo of my youngest daughter along with a couple of her friends. This was back when they still rode motorcycles. Fortunately, they eventually opted for the improved safety of their beloved Jeeps. I wanted to include some corrugated cardboard from the DT packaging. It helped with the rugged vibe!  


Next began the fun of adding layers using all the new epejemra from the Young and Free ephemera pack.  I also did some fussy cutting from the Art Book Vol 2. 


The 13 Arts microbeads is one of my favorite products. They provide such great texture. 


Here you can get a small glimpse of the metallic shine from the Color Glow which is a powdered metallic watercolor. 


You know that I love dimension! 
Lastly I splashed with some 13 Arts black acrylic paint. 


Here are just a few of the products that I've used to create my layout. 

13 Arts is now posting on Instagram. Facebook and YouTube. Not too many people like blogging but alas, I still do! 

Thanks for coming by! 
See you next time! 


Monday, March 1, 2021

Lovely Memories ~ Creative Embellishments March Challenge

 Welcome to March, everybody! 

And to a new Challenge over at Creative Embellishments! 

This month we are featuring a sketch Challenge. What a great way to break a new page and get fantastic results! 


I decided to go the vintage route this time around and chose some photos of my Mom, Dad, Aunt and myself from many years ago on a trip to Indiana. 

I decide to use the Time Flies Frame Set and printed my photos accordingly. 
While that was drying, I went ahead and prepped my papers and used the Clock Stencil and modeling paste. For dimension, I also used the Circle Bokeh Stamp

The twist to the Challenge is to use stitching, faux or real, so I've used the Cross Stitch Border under my focal area. All my chipboard was painted with Walnut Stain. 


The sketch shows a banner across the top which of course, is optional but I chose to mimic it and used the Mason Jar Banner.   When I began adhering my banner, I realized that I had painted the wrong side of the banner. I would have just flipped it over but I already had glue on my chipboard. The only difference is that the true side has laser cut etched details which really made the mason jars pop. 

You can see some of my stamping here as well. 


For color and to highlight the raise areas of the stencils, I have used 13 Arts Yellow Amber water ink and pushed it with water. 


Here's a close up of the Cross Stitch border. It's such a great piece! And perfect for my Mom as she was an accomplished seamstress. 


I adore all the chipboard frames with these cut out words. There are several of them in the store. 


For softness, I've added some flowers throughout the design.. 
I've been using less flowers lately as well as going smaller with them than in the past. 

Thanks for coming by today! 
See you next time.

Here is the sketch: 


Can't wait to see what you create! 


Creative Embellishments products used: 

Time Flies Frame Set

Mason Jar Banner

Clock Stencil

Circle Bokeh Stamp