Friday, February 24, 2023

After the Storm with Sandi Clarkson

 Hello, scrappy friends!

Thanks for coming by the blog today.

I know it's maybe a little early but I have something GREEN for you today. This is my little nod to St. Patrick's Day but without the shamrocks.


I remember doing a monochromatic layout about 10+ years ago in varying shades of green. Although I didn't expect to like it, I was unexpectedly pleased with the outcome. So, I thought perhaps I could do something similar in honor of Saint Patrick's Day this year. Well, the odds were in my favor, I think!


So, then I began the process of finding just the right photo and the right papers and the right chipboard. You know the drill, I'm sure. Once I found my photo, everything felt right. After looking through my papers, I opted for this stunning paper from 13 Arts Dreamland collection which blended perfectly with the mood of the photo. At least from my standpoint. Life for me right now is a swirl of emotions and difficult days. But I trust that something beautiful will come along in the days ahead.


But back to my project .... next I started choosing my chipboard pieces and was thinking along the line of flowers and flourishes, maybe a frame. However, I came up with some interesting choices that I felt were just perfect in the end. I knew that the green color palette would blend everything together but the pieces actually told a little story as I went along.


I wanted to use one of the 6x6 panels to ground my photo. I have plenty of options in my stash, that's for sure. However, the shape of the Rectangle Panel seems to be a fantastic juxtaposition for the photo and really grounded the focal area. Love that choice for this project! It was altered with Distress Paint in "Peeled Paint" and later dabbed with the same color way but in the ink format.


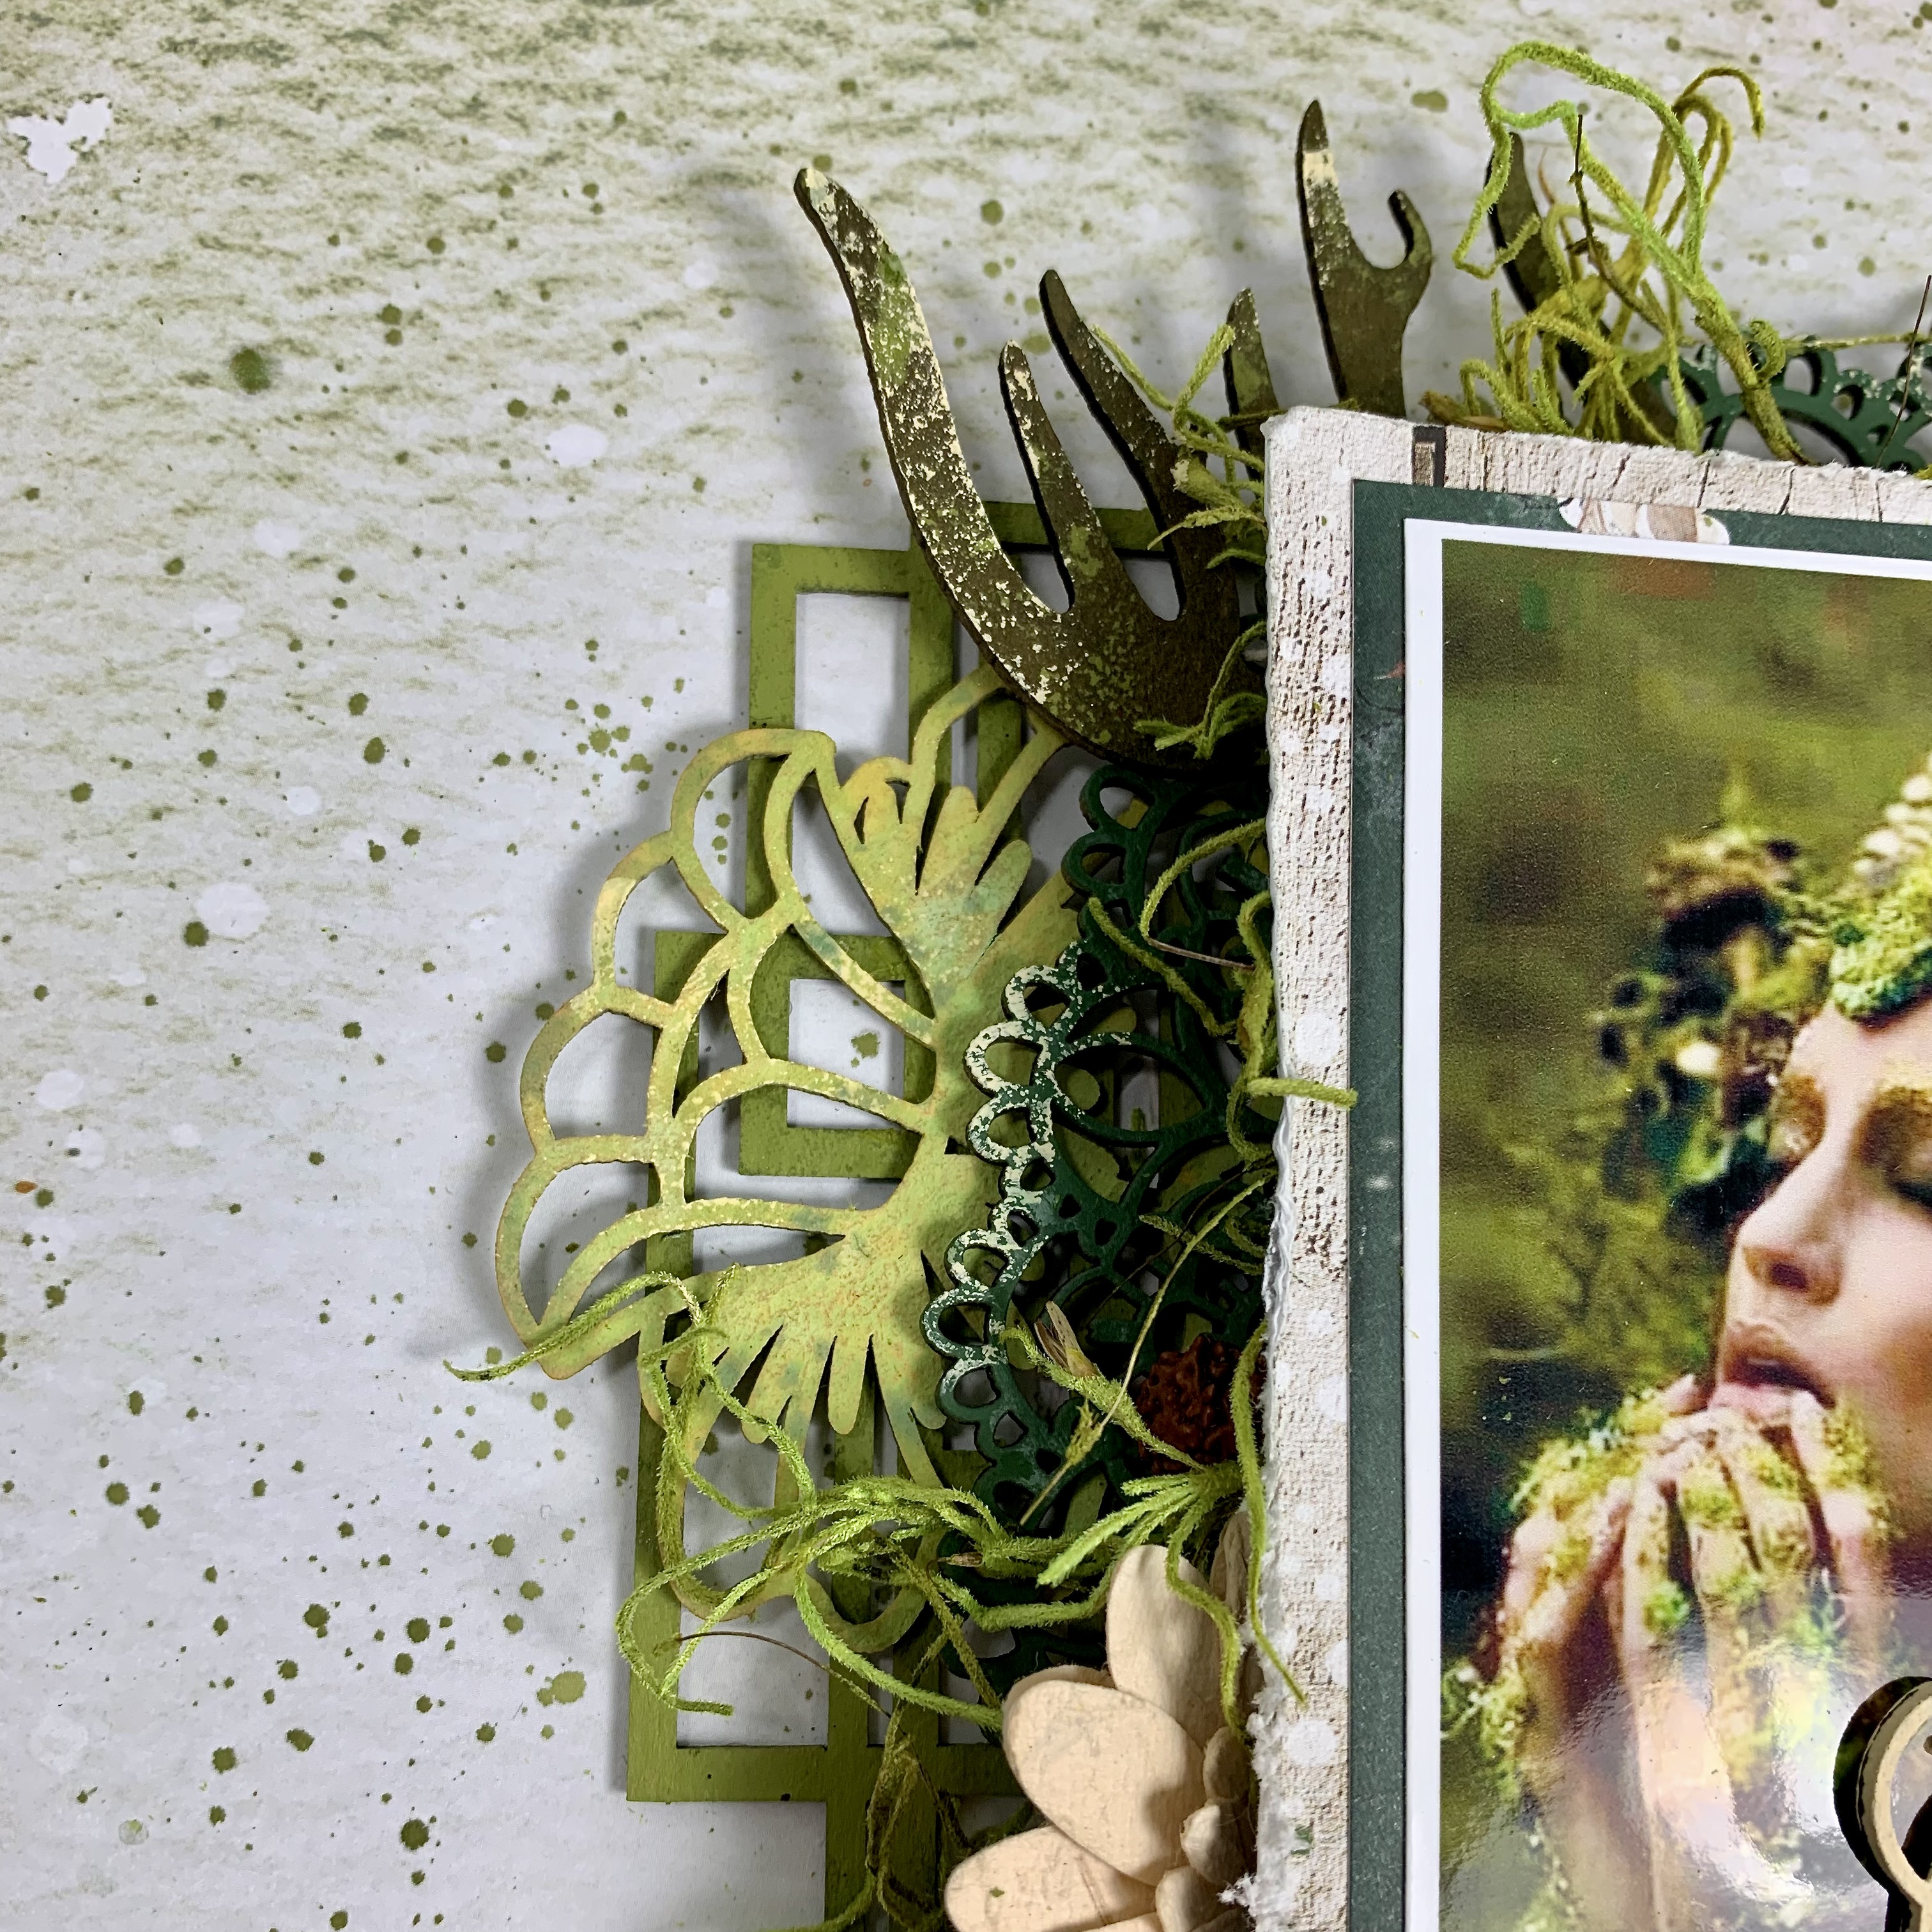
Rather than using a frame for my photo, I wanted something circular behind the photo and opted for the Doily 2 which was altered with Distress Paint in Rustic Wilderness and then splattered with the same in the Oxide version. Later it was dabbed slightly with a cheap cream craft paint from the big box store. This cream paint blended all my pieces together much like you could do with white gesso.
 
I had fairly recently acquired the sweet Daffodils 2 which were in my Flourishes and Flowers folder. I thought they would be perfect to represent beauty springing up from the ground. Or hopefully, what will spring forth in my own heart and soul as I travel this bumpy road. These were altered multiple time with Distress Oxide in Mustard Seed, Twisted Citron and Wild Honey. They were later splattered with Distress Peeled Paint Stain and inked along the edges. This was a "you get what you get and you don't throw a fit" moment. It actually turned out great and brought out similar colors from the photo.  And I love using my stash!


This photo shows some details along the bottom of the focal area and you can see where I've added my title piece from the Blizzard Word Set. This was painted with the cream paint mentioned above and does bring out a few details from the photo.
I had planned from the get-go to call this piece After the Rain or After the Storm, so this accidental finding of this word amongst the Blizzard Word Set was bizarre! Just another reminder to look for the good in all situations, whether life or crafting.


Of course, I wanted to throw in some alters because there are some in the photo but I was down to just a few in my stash but went with what I had on hand! There are 2 different kinds of pieces both called Antlers in the Store, so you will need to pick these: Antlers.  Either would work and are quite nice but I do love randomly tucking them into my projects! These were altered with Peeled Paint Stain and splattered with Citron Oxide and then dabbed with cream paint at the end. Love, love how they turned out!


I wasn't sure if I'd add florals to my layout but I did settle on using a couple of parchment colored ones from 49 and Market. I also tucked in some lime moss here and there.  Great for added dimension.


Just a closer view of the upper edge of the focal area where you can visualize the Doily 2 and more Antlers.


And one last look at the completed page.
 
Spring is Coming, folks!
 New Life, new growth, maybe even a little Hope.
But first, it has to rain.
 
Thanks again for stopping by and hope to see you next time!
 
Sandi
 

Friday, February 10, 2023

Loving Lucy with Sandi Clarkson

Hello, Creative Embellishments fans!

 Sandi  here with you today sharing a Lucy layout featuring a publicity photo from when she was quite young.


This is one of those projects that took me forever simply because I was trying to conquer too many variable. This paper, that photo, mindful of background images, on and on. When I finally committed to just focus on my chippies, everything fell together so easily! Sometimes you just have to START and trust the process!


My papers are from 49 and Market's Serenity collection plus an additional brown card stock as my base. All my embellishments are from the January LE Kit from My Creative Scrapbook. I've used 3 chippies and they were all altered with Walnut Stain.

After prepping my paper and doing a little stencil work, I determined where I'd place my focal image and laid out my horizontal pieces. From there I knew where I wanted to add my Loved rub-on. Rather than using this as a title, I made it more part of the background images. Then I adhered the horizontal pieces and tucked my Lace Border 7 under the other 2 items.

Of course placing my florals and embellishments were among the last things I did before my paint splatters and adding some final pearls.

Below the Lace Border I added my title from the Gorgeous Small Border Set which again was altered with Walnut Stain.

One of my most favorite frames from Creative Embellishments is the Flourish Circle Frame. After altering it with Walnut Stain, I added some random, scattered  heat embossing using my chunky Stampendous Aged Gold embossing powder.

Here are two more images of the focal area:

Once I finished with my pearls and paint splatters, I finally felt finished! 

This was a fun one to do.

Thanks for coming by the blog today!

See you next time ...

Sandi 


Friday, February 3, 2023

Wedding Canvas ~ Creative Embellishments

Hello, Creative Embellishments friends!

Sandi here with you this Friday sharing my latest canvas board project for Creative Embellishments Design Team.


Well, this is definitely the month of love with Valentine's Day rapidly approaching. So, I decided it would be fun to create a mixed media canvas board using a floral photo and some of my favorite chippies!! And of course, a good coat of crackle paste that I let sit overnight to dry.


So to start ... after adding some color to my canvas board, I grabbed the Heart Balloon Set and began altering with some older mists from Shimmerz, Tim Holtz and 13 Arts with a dab of Heidi Swapp Shine.  As always, you can see that I just keep mixing until I get the color I want. I could have even gone a bit lighter but I wanted a mix of a coral and red with some gold shine to it. After drying these were adhered near the top.


The second chippy to get my attention was the fabulous Scribbles chipboard. When this design first came out, I wondered if it could fit with my style. Well, let me tell you: this is perfect for so many things. For me, I use it as a layer and it almost replicates the use of thread or other fibers on a project! This one is a must! I've altered it with 13 Arts Pastel Blue mist. You can see more of it a few photos below.


What better thing to focus on during this week's winter storm than a lovely spring or summer day! Along with that thought came recalling the wood veneer  Bumblebees in my stash. These are beautifully etched and there is no alteration required unless you wanted to do so.


Here is another close-up of the Scribbles piece. I just adore this sweet chippy.


But okay, can we have a favorite chipboard piece? Well, I don't know but seriously, this Heart Dangle 2 is just gorgeous! I can't even count how many times I've reached for it! This time I altered it with walnut stain and metallic wax. Love, love, love it!


Here's the other Bumblebee along with some florals, pearls and ephemera.


In the Heart Balloon Set you will get  a couple of balloon clusters along with some singles. I used the singles on the left hand side of the photo.


I always like to take a dimensional shot from the side to demonstrate the height and breadth.


Extra texture was achieved with cheesecloth, florals and pearls.

The final touch was splattering with paint and making sure my edges were low enhanced.

Hopefully today's project will spark some ideas in your own creative mind.


Many thanks for stopping by the blog today!

As always, I'll see you next time!

Sandi