Monday, February 28, 2022

Organization ~ 13 Arts

Hello, Creative Friends? 

Do you struggle with staying organized or is organization the thing you like best about crafting? Haha!


For myself, I'd usually rather spend time creating, so I've created a little booklet to keep better track of my @13arts paper collections. As newer releases arrive, my older products tend to move downward in my paper tower. Even though I am quite familiar with the products, sometimes I just want to know where are all my greens? Or where are all my wood slat papers? 


So .. I've solved the problem by sacrificing part of the front covers of all my 13 Arts 6x6 paper pads and putting them together with as a small album featuring 24 13 Arts paper collections from my time with the Team. For those collections that have no matching 6x6 pads, I created a sample by snagging a photo from the online store, cropping and printing it in 4x6 inch format.


For interest, I've also included a few random photos of projects I created with my papers, as well as printed copies of my DT badges throughout the past few years. I also plan to add labeled samples of my Color Glows but that is a project for another day.


Here are a few more photos: 


There's one of my Dt projects right there! 


This basket sits on my desk and stores some of my smaller items for 13 Arts including my Art Books, ephemera and stencils. And now it houses my little reference book. 


Thanks for dropping by!
Sandi


Friday, February 25, 2022

Floral Canvas for Creative Embellishments!

Hello, creative friends! 

Sandi Clarkson here with you today sharing my newest project for Creative Embellishments

This time around I've created another 8x10 inch canvas board where I built up my crackle paste.  Then the canvas was altered with inks, mists and other color from 13 Arts after the crackle paste sat for 24 hours to dry.


Once my board was good and dry, I began adding Pearl Gold down the center and applied Chalk White down the side of the piece. I moved it a bit with water and with the heat gun. 

My chipboard pieces were first dabbed with white gesso and then altered with Old Gold and Chalk Woodbine which is a dark wine color. 


I created a base for my photo with a lovely combination of 49 and Market florals in Parchment and in Ocean Jade. For balance with the photo, I also included some 40 and Market mini Ginger florals. 

Next it was a matter of tucking in my chipboard pieces which I trimmed as needed to fit where I wanted them to be placed. My favorite (and the ones I was inspired by) are the Baby's Breath pieces. Love them and try to use them several times a year.

To add something complimentary, I choose a few pieces from the Mini Leaves Set 2 which were altered with the Woodbine color. 


I splattered my canvas with both white gesso as well as with some of the 13 Arts Woodbine color. 
For texture, I alos incuded bits of a crochet doily. 


I decided to also use some of the new acrylic mirror pieces in Rose Gold. They are scattered around the focal area. I used both the inner pieces as well as the outer pieces. You can find them in the store with this link: Mirror Acrylic Stars Rose Gold


Angle shots are always fun. This one shows the little Flair piece from the Seasons Change set. 


For some reason, I am really digging that marron leaf from the Mini Leaves Set 2


One last photo! 

I think that's about it for today.
 Please let me know if you have any question~

Thanks for stopping by! 
I will be on a bit of a break but will see you soon! 
Sandi


Creative Embellishments products used: 

Chipboard: 

Baby's Breath

Mini Leaves Set 2

Flair: 

Seasons Change

Acrylic: 

Mirror Acrylic Stars Rose Gold


Monday, February 14, 2022

Altered Globe for 13 Arts ~ Happy Valentines Day!

Happy Valentines Day to all my friends across the globe! 

Today I'm sharing my Design Team inspiration for 13 Arts using a cheap globe from a big box store and yummy Rice Paper from 13 Arts Back in Time collection. 


I first used a light wash of 13 Arts white gesso to cover the globe because it was black. I was a little afraid the black print would fade away on a darker surface. 

Then I slowly began adding my strips of Rice Powder with 13 Arts Gel Medium. 

Next, I began creating a swath of vintage Rust Effects for my florals using our Rusty Bronze Powder along with the Reagent to activate. I also rusted the base of the globe. It was quite the mess but I was determined to get it done and done as well as possible for a beginner orb alterer. 

Then I dry brushed some areas with our older Care Au Lait paint. I like how that color looks with all the metals adornments. Most of these are from 13 Arts although the locks and chains are Tim Holtz. 


I slowly and carefully began adding my florals and metal pieces using 13 Arts mutilpurpose gel medium. It did a great job of holding everything although I did have to be patient with a few items. 

I suspected my large Winged piece would really slide but it actually held better than the timepieces. 

I forgot to mention that I also used a base of cheesecloth along the line of the Rust that was altered with Amber Yellow Chalk Mist. 


Because I wanted even more texture, I added in lots of the little bits from the 49 and Market florals, all the curlicues and buds. 

Things such as the bees were added toward the last to fill in as needed. Everything was adhered with the multipurpose gel medium. 


To help with the large metal winged piece, I added a piece of cardboard underneath so that that would be the piece that was actually glued to the curved surface, Worked great! 


Here you can see some of the Rust Effect at the top of the globe. 
Towards the completion of the project, I added some Back in Time Ephemera as well as brown/bronze microspheres. 


There is my cute little bee up above the print of the Rice Paper. 
I used another one on one of the clock faces. 


I wanted my cheesecloth to drape down to the base of the globe for decorative effect but it also became helpful to stabilize the globe after it got kind of top heavy with embellishments. 

One other thing I did was paint a large cabochon and secured it under the actual orb and the curved part of the piece above the base. It kept the globe from turning every which a way. 


And awwww ... Rust! 
Love it! 


Here are many of the items used in my project although some items must be out of stock now. And I did forget to add an image of the white gesso. 

That's it for today! 

This was fun and something different! 
Much love from me to my friends in the Scrappy community! 

See you next time,
Sandi


Friday, February 11, 2022

Snow Queen ~ Creative Embellishments Canvas

Hello, Creative Embellishments fans! 

Sandi Clarkson here with you today! 

I was in the mood to create on a canvas board using my fun crackle paste technique and this time adding my 13 Arts Navy Water Ink and White watercolor to create an ombre winter piece. Because I had last used my brush with walnut stain, my Navy did turn a bit teal in appearance. 


From there I wanted to just create a frosty, wintry look. Not that I like Winter weather because in fact, I don't ... but I really love looking at it from the warmth of my hearth. And I really do enjoy creating Winter pieces featuring fun Snow Queens. 


All of my chipboard pieces were painted with white 13 Arts paint. For accent, I did add Old Silver metallic wax highlights as well as a custom wax made from 13 Arts Old Silver Glitter ink along with a clear matte decoupage wax. 

My primary chipboard inspiration pieces are the Holly and Berry Frame and the small piece from the Icicle Borders


I laid my focal photo on a bed of bark roots from a local craft store. I did dab it with white paint to make it  blend a little better. 


I always like to add a few Flair if I can. This time I chose the Winter Flair set. My title piece is from the Blizzard Word Set


Of course, I added a few small snowflakes from the Chipboard Snowflakes package. 

I finished up with my typical paint splatters and few flat-backed pearls. 

I hope you enjoyed this bit of Winter inspiration. I've linked all the Creative Embellishments pieces below. 

Thanks for coming by! 
See you next time! 

Sandi


Creative Embellishments products used: 

Chipboard: 

Chipboard Snowflakes

Holly and Berry Frame

Icicle Borders

Blizzard Word Set

Flair: 

Winter Flair


Saturday, February 5, 2022

Valentine "Lucy" Layout ~ Creative Embellishments

Hey there, Creative Embellishments fans! 

Sandi Clarkson here with you today sharing a layout (of sorts) created on one of the awesome CE Circle Panels. 

In this instance, it is the beautiful Large Leaves Circle


First, I altered the Large Leaves Circle piece with a walnut stain. Then I went back over it with both a gold and a red wax for dimension.  I also did some random heat embossing with Stampendous Aged Gold embossing powder.  I don't normally do a lot of heat embossing but thought Lucy deserved some glamour during this month of Love. 

Then I adhered my circle to some Sunrise papers from 13 Arts cut to size. 

I moved on to cover 2 of the Tags from the Tag Set 1 with A4 papers again from the Sunrise paper collection. Then I positioned them where I liked them on my composition. Each was elevated with corrugated cardboard underneath. 

While I had the embossing supplies handy, I went ahead and did the same alteration to both the Heart with Arrow  piece from the Shaker Set as well as the gorgeously designed Flourish Heart Frame 1 which I later placed on top of Lucy's almost vintage publicity photo. 

My title/sentiment was taken from the Gorgeous Small Border Word Set and altered with walnut stain. I did snip the tails off of the chipboard title so that it wouldn't look so cluttered. 

I finished with some florals and a few small gold microbeads. 

Here are a few close-ups for you: 


And the layout is completed! 

Sometimes it's fun to play around with something you don't do on a regular basis. 

And if you need some retail therapy, I have provided links to all the Creative Embellishments products below. 

Thanks so much for coming by today! 
As always I love reading your comments! 

See you next time. 

Sandi

Creative Embellishments products used: 

Chipboard: 

Large Leaves Circle

Tag Set 1

Heart with Arrow Shaker

Gorgeous Small Border Word Set

Flourish Heart Frame 1


Tuesday, February 1, 2022

13 Arts February Challenge is Live!

 Hello, creative friends! 
It's the first of February and time for another great Challenge over at 13 Arts on Instagram. 
You need to use the hashtag #13ArtsFeb22 to play along. 
I've added the mood board image near the end of this post. 


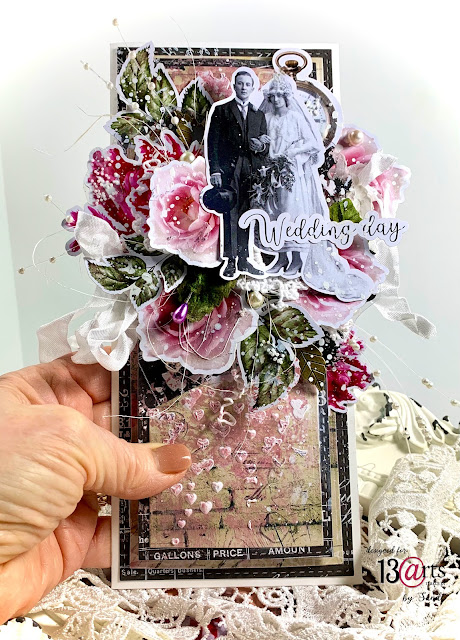
The bright color in the mood board image looked more hot pink to me than red, so that is the direction I went for my DT take on the Challenge. I paired the Carmen paper collection with the Back in Time collection to create this romantic, shabby chic DL sized card. The sentiment is from In Love. I've used a die from Pink Fresh to cut the papers and then made a custom white card base. 

For background texture I added some stamping with the Back in Time stamp along with modeling paste pushed through the Falling Hearts Stencil. All items from 13 Arts Store. For you crafters in the USA who may be looking to save postage, Bluemoon Scrapbooking also carries most of the 13 Arts paper collections. 


I love adding lots of layers and texture, so I fiddled with my composition until I got it the way I liked best. Then I used corrugated cardboard along with foam squares to separate the layers. I've added sisal, stamping. crinkle ribbon and pearls to kick things up a notch. 


Just adding a little view from the left. 


And from the right. 


Another item I've used for texture was a metal leaf from 13 Arts and pieces of a white crochet doily from Kaisercraft. 


I do love the Falling Hearts stencil and use it frequently. For highlighting, I've used our Rose Quartz Color Glow. 


Additionally, I tucked in some pearl spray that I bought long ago in the bridal section of a big box craft store. 


Hopefully you can see the details a bit better in this photo. 


And here is that awesome Challenge image! 
We hope you can join us on Instagram for a change to win a prize and to be a Guest Designer with 13 Arts. 
#13ArtsFeb22

Thanks for coming by today! 
Sandi