Friday, May 28, 2021

Bring out the Stamps! ~ 13 Arts group post

     Hello, creative friends! 

Do you like to use stamps? 

Well then, today is your day to enjoy some Stamp projects from the 13 Arts Design Team. 


I rarely share what I put in my journal but went outside my comfort zone to show how I break in my new stamps. I ink them up and then practice stamping with them in my journal ... or even on random scraps of paper. But doing it in my art journal gives me something permanent to refer back to. 


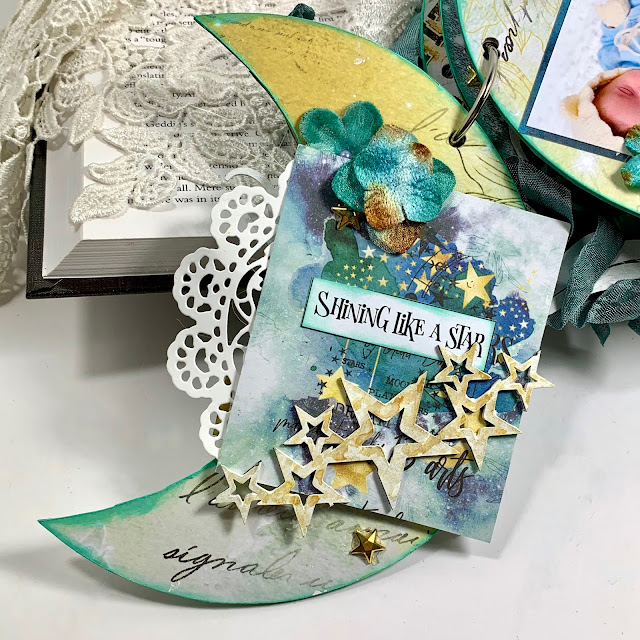
For today's project, I'm using the stamps from the new Young and Free collection as well as the floral stamp from Pastel Spring. 

I boxed in my text from the Young and Free stamp to define it a bit more. 


Then I added the floral and leaf designs around the margin of the text. 
I am a novice at actually using watercolors for anything but a random background. However, here I have tried my hand at having a play with them on my florals, leaves and even the background wash. 

Not exactly the kind of thing that I normally share but this is the best way to overcome our shortcomings.... just practice, practice, practice! 

Thanks for coming by today! 
Sandi


Monday, May 24, 2021

Under the Stars ~ Moon Mini Album for Creative Embellishments

Hello, creative friends! 
Sandi Clarkson here with you today sharing a sweet baby album using the awesome Moon Mini Album, lots of other chipboard and one of my favorite 13 Arts paper collection, Under the Stars. 
For this album, I've chosen newborn photos from our sweet grand baby Joel.

 
This project was a little hard to photograph because I was determined to use one of the new CE chipboard pieces called Wavy Flourish. It is such a grand piece, you absolutely need to check it out! It provided great movement across the front cover. I embellished it with one simple floral and a title cut from the Under the Stars ephemera sheet and mounted on patterned paper. I covered all the moon shaped album pieces with my same paper collection. 
A few gold stars from 13 Arts and the cover was done. I did go ahead and punch the hole for the jump ring but waited on the album assembly until the end. 


Here is a second photograph of the project with some of the pages opened up to give you a sneak peek of what's coming! 


And as always, I went chunky even though this album is slender, I packed in a lot of stuff just for fun. I did not add pockets or flaps but you certainly could if so desired! 


Here is the inside cover which I kept pretty simple with papers, a title and some stars from the Star Pieces set. These painted white and then randomly dabbed with gold mist to coordinate with the added gold stars. The white die cut was already laying on my desk, waiting for a home. 


Awww, and here are a few of Joel's sweet photos. I incorporated the word BABY using the Alphabet Blocks, 2 sets so that I would have 2 Bs. I also encircled the bottom photo with an element from the Love Artist Trading Coins. It was painted white to coordinate with other elements. 


Again, I reached for some ATCs and used more of the Love Artist Trading Coins.


On this page I opted to add some teal chalk ink to the white Love Artist Trading Coins.
A few die cuts, photo and done! 


Every boy needs a kite, right? So, I applied the same treatment as above to this sweet kite from the 
Kites chipbard set. 
For dimension I added some pearl drops and let them dry overnight. Additionally, I added some florals to the kite mainly for height so that it couldn't get stuck to the facing page. 


This time I used a coin from the Shape Artist Trading Coins to feature this really touching photo of Joel's daddy holding him. 


Next up was "momma" because I wanted her photo to be facing the page with the large sentiment piece. 
This last coin was from the Family ATC Coin set. I love the mood that the tree created for this set of pages. 


And here is that stellar I love you to the moon..  title piece which I painted with walnut stain so that it would have some contrast on this lighter color paper which I love and wanted to use somewhere. 
A few stars and flowers keep everything consistent! 


And finally the back cover with I wanted to keep flat, so die cuts and stars only, no chipboard. 


And ha, ha, one more chunky photo because I just couldn't resist! 

Now just because I leaned heavily on the ATC pieces doesn't mean there isn't other awesome pieces that you could choose from. There are a myriad of directions that you could go. ... even mixed media steampunk or whatever. 
However, ever since Joel was born and we got his diagnosis, it has been on my heart to create a baby album for his momma. 

Thanks for coming by today! 
As always we appreciate your support of Creative Embellishments. 
Below is a list of the CE products used. 

Sandi


Creative Embellishments products used: 

Moon Mini Album

Wavy Flourish

Love Artist Trading Coins, 2 sets

Family ATC Coin

Shape Artist Trading Coins

Star Pieces

Kites

I love you to the moon..

.Alphabet Blocks, 2 sets


13 Arts Under the Star collection 

available at the 13 Arts online store or Bluemoon Scrapbooking 


Wednesday, May 19, 2021

In Love ~ Bridal layout for 13 Arts

Hello, creative friends! 
Today I'm sharing a project created for 13 Arts


For this project I've used the new In Love collection along with one sheet from the Dreamland collection. 

I had fun with my In Love stencil and used my watercolors to mimic the flowers and vines in the stencil design. That took some time as it is a little outside my norm. 


For textures, I've added sisal as well as the Gold Hologram glitter from the store. It appears multi-colored here but is actually gold. 
Lots of die cuts help bulk up my page. 


Here you can see a bit of the stencil coloring that I did. Not perfect but it was fun and relaxing to do. 


I also pulled out the Silhouette and die cut some greenery to tuck in amongst my layers. These I drug through the excess watercolor on my mixed media mat. 


One of the last things I did was to splatter both white gesso as well as the raspberry color from the watercolor, set of 16. 


Just another angle and the chipboard from the In Love collection is painted in Sand. 


I like seeing dimension, so here are a couple of those kinds of shots. 


Last one! 


Here is a collage of most of the items used in project. 

Thanks for coming by today. 
I hope that you are inspired to create! 

Sandi


Monday, May 10, 2021

#100 Days of School ~ Cute layout for Creative Embellishments

Hello, creative friends! 
Sandi here with you today sharing a fun layout for Creative Embellishments

I had a couple of cute photos of my niece dressed up for the 100th Day of School celebration. Cutest little granny that I ever saw! 


Since I was going with a "school" theme, I chose one of the bright papers from 13 Arts Young and Free collection. 
As usual I prepped my paper with cleat gesso and then added some stenciling using the Typewriter Keys Stencil and modeling paste. I also did random stamping with the Binary Stamp

For a foundation piece for my photo. I opted to go with the Number Panel which I stained walnut brown and highlighted with red and peacock waxes. I cut it in 2 pieces since I was using 2 matted photos and I wanted the panel to be visible from both sides of the focal area. 

Then I backed my photos with paper corrugated cardboard to give them height. 


For fun theme based accents, I added a few wood veneer pieces from the CE store: Ruler (set of 6)Scissors (set of 6)Geek Chic Glasses (the heart and star) as well as using the chipboard Paper clips


As I went through my stash, I found some wood veneer Numbers and decided to include these in my title. Alas, I only had one set, so only a single Zero. To compensate, I opted to use the 8 instead and laid it on its side to create 1my 00. The rest of the title is computer generated. 


One of my last steps was adding some florals to soften the page and make it more more my shabby style. 


Then I splattered with both white gesso and black paint to define the focal area. 
Be sure you cover your photo with paper or packaging to protect it from the splatters. 


And here is how my sweet title turned out! I even found a sticker from the Young and Free collection that is perfect for my layout: We are the Future.


I think that about wraps it up for today. 

Thanks so much for stopping by the blog! 

I have included links below for all the items used from the Creative Embellishments store. 

Sandi


Creative Embellishments products used: 

Chipboard: 

Number Panel

Paper clips

Wood Veneer:

Numbers

Ruler (set of 6)

Scissors (set of 6)

Geek Chic Glasses

Stencil:

Typewriter Keys Stencil

Stamp:

Binary Stamp


Sunday, May 2, 2021

Feminine Card set for Creative Embellishments May Challenge!


Welcome to a belated May Day, Creative Embellishments fans! 

Sandi here today sharing my take on the Challenge and its twist! 

Repeating patterns! 


The mood board is depicted in bright colors but my inspiration came from the circles and circle pattern as well as the swirls. I've created a feminine card and little tag using an old SOUS sketch. 

My base is stamped with the Small Bokeh Stamp and also has an inked pattern coming from the Small Circle Stencil and Vintage Photo ink. I punched out my circles with an old 1/5 inch CM punch but I've used my Creative Embellishments Buttons to adorn them. They were embossed with BFS embossing powder in Petal which unfortunately has lots of glitter in it! Such a mess. :) 

 I did also repeat the buttons. Additionally, there are 2 or more circles within the buttons! Yay! 

For a final statement touch, I've added one of the Flourish Butterflies which I inked with 13 Arts Navy water ink. My papers are from the 13 Arts Sunrise collection. 

Can't wait to see your take on the Challenge!

Here are some close-ups! 


This Challenge required lots of thinking and planning beforehand but once I had my idea, it went pretty much as planned. It's nice to think outside the box occasionally. 

Thanks for coming by! 

Sandi


Creative Embellishments products used: 

Small Circle Stencil

Small Bokeh Stamp

 Buttons

Fourish Butterfly Set 2 


Saturday, May 1, 2021

"Gentleman Gangsta" ~ 13 Arts May Challenge

 Welcome to May, creative friends! 

Can you believe we are this far into the new year? 

Today I'm sharing my take on the 13 Arts May Challenge. 

I'll include the Challenge MoodBoard at the end of this post. 

I've scrapped this photo before but I thought it would be perfect for the May Mood Board. It's a photo of my daughter, son-in-law and 2 of their good friends. Photo credit to Cindy Taylor Anderson. 

Fortunately they have traded in their motorcycles for the much safer Jeep lifestyle. My tongue is just a fun little tongue-in-cheek

Fun but much more safe. Sadly, their friends lost a son to a motorcycle accident on his first ride. 

I've used the Mr Handsome collection along with my favorite Water Inks, brown and navy. 

Here are a few close-ups: 


This one was SO fun to create! 

And here is the May Challenge image: 


The Challenge is on Instagram. 
Look for the #13ArtaMay21 hashtag. 

See you soon! 
Sandi