Friday, June 24, 2022

"Circa 1939" ~ Mixed Media Canvas with Sandi Clarkson

 Hello, Creative Embellishments fans! 

Sandi Clarkson here with you today sharing a vintage-inspired canvas board using an old photo of my beloved Dad. The back of the photo says that this was his Senior photo from high school. 

I recently ordered the new Moth Set from the CE store and thought it would pair nicely with either an outdoor scene or with something masculine. As you can see, I went with masculine. 


As crackle is my jam, that's where I began with this piece. It dried over the course of several days before I began working on the project. My color choices started as a combination of pastel mint green and a very pale blue. I loved that combo but felt I needed to go darker with this vintage and masculine vibe. So, I started layering my 13 Arts colors until I achieved what you see here. The only media not 13 Arts was a splattering of Tim Holtz Wild Honey Oxide. 


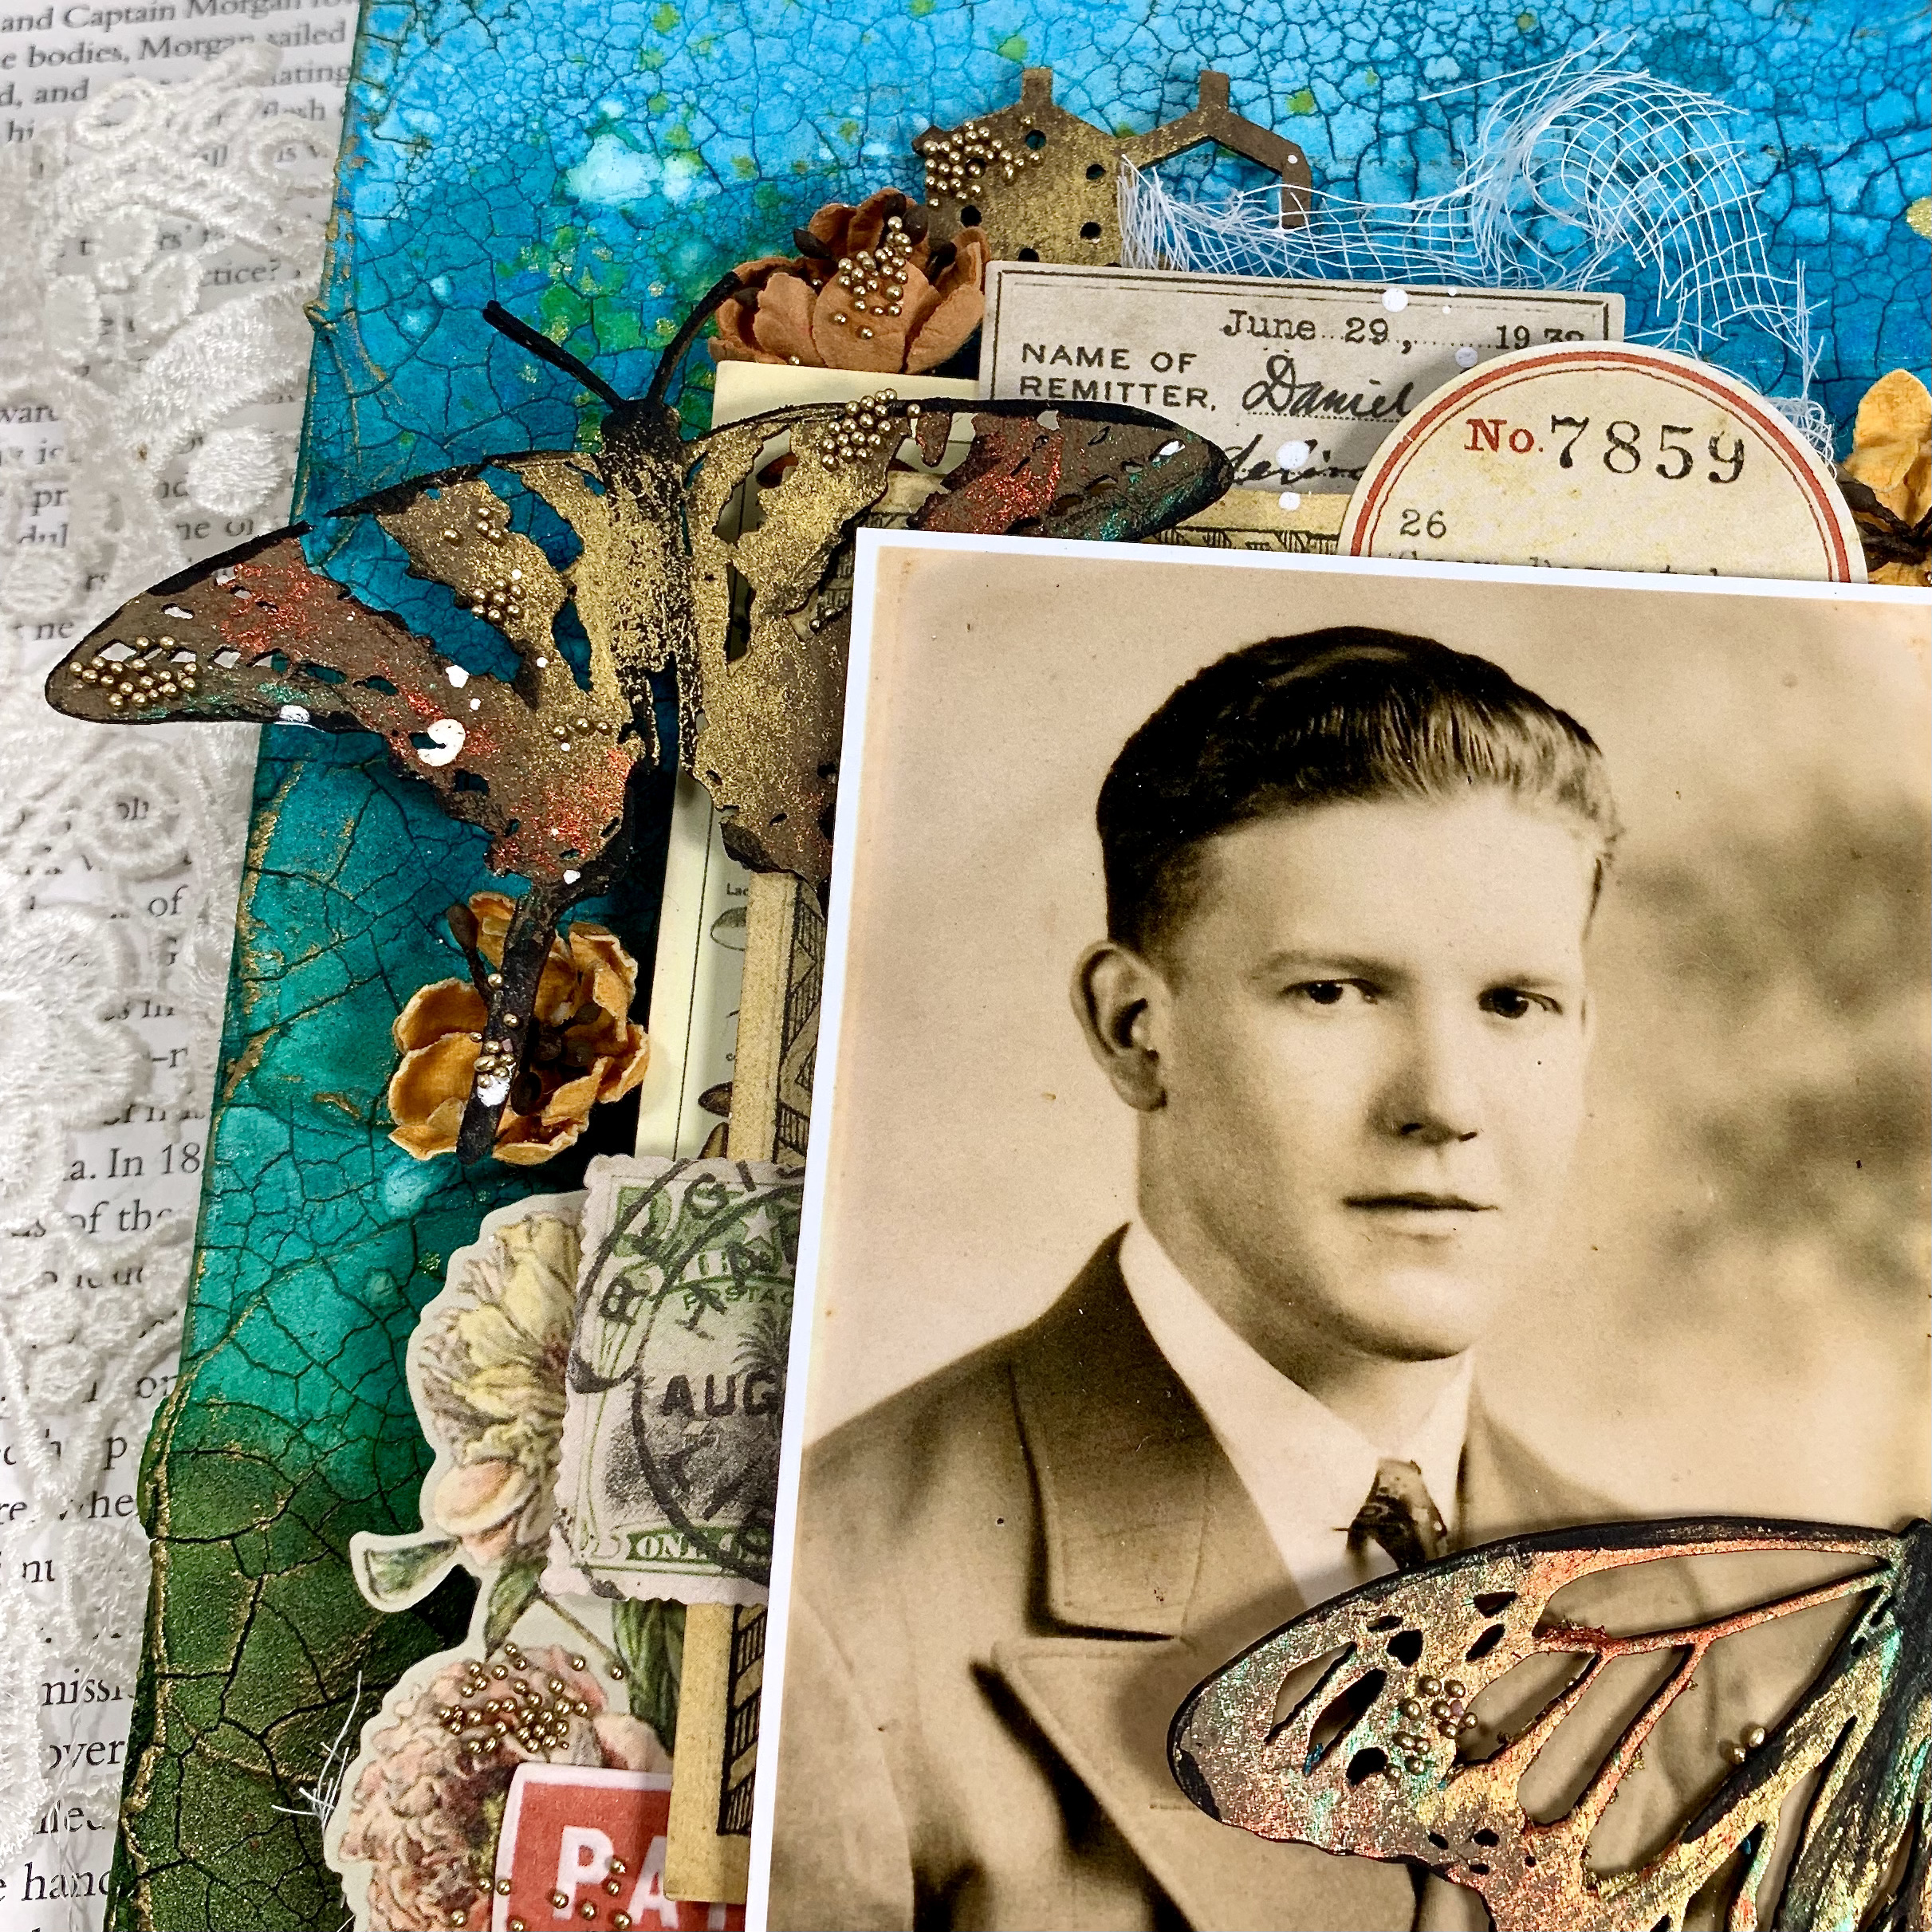
Next, I stained all the chipboard with Walnut Stain and then used some custom waxes created with Decoupage wax and my 13 Arts Color Glows. Under the focal area, I layered in the Riveted Honeycomb using 2 pieces and offsetting them for balance. Additionally, I used the waxes as highlights on my dried crackle paste.It makes the background look so interesting and provide depth. I do find it hard to stamp on crackle, so I skipped that step this time. 

My ephemera is Tim Holtz Idealogy Field Notes. 


I love layers so had fun tucking in some extra ephemera. You can also visualize some of the honeycomb as well as all that great crackle! 


Here is a close-up of that other side! The Moth Set is such an awesome 4 pack of different varieties. 


I cropped the focal area to give you a better idea where all the parts and pieces lie. 
Of course, I finished with a few florals from 49 and Market. 


Just another shot of my favorite moth from the set. One of my final steps was adding the 13 Arts gold microbeads. 


And another look at the Riveted Honeycomb. 


I love the sweet mushrooms in the Field Notes pack and added them here. Mushroom hunting was a fun, family activity as a child. Daddy loved fried mushrooms. 

A bit of added roots in the corner and a final splattering of white gesso concluded this canvas project. 

Now are you ready to get your craft on? 
I hope so. 

And if you need some retail therapy, here is a link to the Creative Embellishments Store. 

See you next time! 
Sandi


Creative Embellishments products used: 

Wednesday, June 15, 2022

"1776" ~ Patriotic Canvas for Creative Embellishments

Hello, creative friends!

Well, I did a thing. 

I created some patriotic art!

Patriotic pieces are not something I gravitate towards ... probably because of the deep feelings of loss that I have experienced. But I overcame them to create a small little work of art.

So yesterday I created on this slim little 3x9 inch canvas from a big box store and am so pleased with how it turned out. It's not exactly what I had in mind but very close! 

I've used a combination of our CE stencils, chipboard, flair buttons and acrylic pieces to create this awesome home decor type canvas.


I referred to an earlier work of mine in 2018 to get the exact colors that I wanted to create with: Shimmerz Scarlet's Fever and Mama Sings the Blues. Worked out great! The white is craft paint tinted with Tim Holtz Antique Linen. 

Before applying my colors, I gave the canvas some texture with 13 Arts modeling paste and the CE Star Bokeh Stencil. The texture got mostly covered up but hey, that's okay. I know it's there! 

Then I moved on to applying the color to my canvas and painting my large Distressed Chevron Border. which help represent the stripes of the American Flag. While I had the flag in mind as inspiration, I didn't hold fast and true to our flag's design. But I wanted that "look."


After adhering the Distressed Chevron Border, I stained the 4thof July ATC coin with walnut stain and some Shimmerz Rollin' in the Hay. Then I covered an Artist Trading Coin with some old paper from DCWV and later placed the Bell piece on the Coin. 


I had ordered some of the Watercolor 4th of July Flair recently and this was my opportunity and motivation to get going on the little art piece. Here you can also see one of the acrylic Mirror Acrylic Gears Gold gears. I should have dug around for my acrylic stars but the gears were on my desk and I thought they added whimsy to the design instead of the expected.


Just a quick snapshot of the chevron border which goes on for miles, ha! 
Actually only 10 inches. 


The 4th of July ATC coins set is a set of 4 designs and I opted to utilize the Liberty Bell with the 1776 cutout along with the stars. You can also visualize a bit of how I distressed my canvas with sandpaper as well as with white paint and blue mist. 


And the star of the show (maybe) ... the Watercolor 4th of July Flair button. I have asked for more watercolor designs, so we shall wait and see on that. And I love these florals from 49 and Market. 


My gold microspheres from 13 Arts had to make an appearance. I decided they would look better than art stones. 


Of course, the Bell needed a little loose string at the top. 
After that, I finished with paint splatters. 

I hope you feel inspired to create something patriotic regardless of where you reside. 
It can be great therapy when you need it most. 

Thanks for coming by the blog today! 

Sandi

Creative Embellishments products used: 
                                                                                Stencil:
Chipboard:
Flair:
Acrylic:


Saturday, June 4, 2022

Birthday Bash ~ Home Decor piece for Creative Embellishments

Happy Saturday, creative friends! 

Sandi Clarkson here with you today featuring a gorgeous Home Decor wood piece from the Creative Embellishments store. 

I've had this piece on hand for a long time and finally decided it was time to use it and hopefully inspire you! 


The Wood Doily piece is almost 12 inches in diameter. The particular birch wood that was laser cut into this intricate design has a rich, beautiful color to it, so I opted to not alter it in any way. I think the piece would look great with warm toned florals and photo but I decided to use the yellow for transition to all the cooler color tones. 

I had this cute little photo already printed out and on my desk waiting to be used. This is our granddaughter Mila Rose celebrating her birthday. 

I created a base using some 13 Arts Pastel Spring papers and ephemera along with florals to support the photo and add color.  Next I altered the Large Clock Face 4" with walnut stain and laid it across the flowers. 


Here you can see a bit of layering of my elements including the home decor piece, florals, moss, the clock face and one of the April Showers Flair


As always, I like to share a bit of the dimension of the project. 


And from the direction as well. 


The title piece is from the  Birthday Word Set and was also altered with walnut stain, some gold splattered spray and splashes of white gesso. Here you can see the other April Showers Flair button that I tucked in amongst the flower cluster. 


As we move to the right side of the project, you will note some more of the Pastel Spring ephemera and also this adorable wood veneer Bumblebee. All I did for them was ink the edges with walnut and brush a bit of Cinammon Stickles to the wings. They were popped up on foam squares. 


And there is the second Bumblebee. 

I finished the project with some gesso splattering as well as applying more of the gold metallic spray. I thought about adding art stones but decided againt it as this will probably be wall mounted. 

I have photographed on a contracting paper from the collection to give you a better idea of the intricacy of the Wood Doily. 

I think that's it for today! 
You can find all the products listed below: 

Creative Embellishments products used:

Home Decor: 

Chipboard:

Wood Veneer:

Flair Button:

Thanks for coming by! 
See you next time! 

Sandi