Thursday, May 23, 2019

Foil with 13 Arts ~ Butterfly Swarm

Hello, everyone! 
I'm back today sharing my group project for 13 Arts. Our focus this month is on their transparent FOIL products.  You can find many of them right HERE. Most of the paper collections have at least one foil transparency in the product line. 


I don't recall ever doing a butterfly swarm project, so that's what I decided to do this go-around. Predictable but fun! 

My base paper is Something Blue from Vintage Summer, side B. It was covered with clear gesso. Then I did a bit of stamping with the Vintage Bouquet Stamp.  For some texture, I colored my modeling paste with Rainbow Color Duo Turquoise and pushed it through the Dandelions Stencil. I also used that color at the end for painting around my photo cluster and for splattering. 


I spent lots of time fussy cutting butterflies from Transparent Foil :Butterfly Garden" and the Wings of Freedom from His and Hers Remastered and then layered the foil on top of the paper replica. For some butterflies. I only used paper because I have already used the matching foil butterfly on other projects.


Just a close-up to show you the dimension of the layered butterflies.


There is one large butterfly cut from the Wings of Freedom from His and Hers Remastered paper that I used as a photo layer. I also fussy cut some flowers from Vintage Summer A4, Vintage Flowers and some tickets from Vintage Moments A4 paper elements. These were added to the cluster as well as some old lace from my stash.

For a title, I chose the word Beautiful from the Chipboard Set Blue Magnolia and left it bare. Then I added some of the gorgeous LUX black crystals 60 pieces. A final splattering with 13 Arts SPLASH White Ayeeda Ink and I was done.

Here are the products used:
Clear Gesso


Thanks for coming by! 
I so appreciate every visit and every comment! 

See you next time! 


Wednesday, May 22, 2019

Freedom isn't Free ~ Creative Embellishments

Hello, Creative Embellishments fans!
Thanks for stopping by today!

Sandi here with you today sharing a difficult topic but one that is close to my soul.
Folks here in the USA will be celebrating Memorial Day next weekend and so,  this seemed a fitting time  to remember that our Freedom isn't Free.

Regardless of whether you've suffered a war-torn homeland, been separated from family for long months at a time,  lost a loved one killed in action or had your own boots on the ground, then you know the high cost of Freedom.


I'm grateful that this emotionally difficult layout was made easier with the use of some awesome CE chipboard and stamps. It all began with that great title piece Freedom isn't Free .

It was stained with walnut ink and mounted on an elevated notecard. Layered under it is the equally awesome Grunge Harlequin Piece which was also stained with walnut ink. At the end of course, everything was dabbed with white gesso.


Here is a close-up of that section of the page. I used some roots underneath to add some texture to the layout. You can also see some punch work that I did on on the left hand layering sheet, primarily for texture. These war photos needed some grunge.


There is a really cool chipboard set in the store called Ripped Notebook Paper and they made great photo mat layers for my photos. I simply inked the edges and then left them bare. Loved using them and plan to order them again soon.
Lastly for this photo, you'll note one of the pieces from the Love Arrow Set.


Next, let's talk about the chipboard Washi Tape Clusters. Wow!

 I left them bare because  they already looked perfect for this particular layout. The way they are created gives them a multi-colored and multi-layered look that was great as is.


In this last photo, you can see some of the random stamping done with the Distressed Corner Stamp
That just about wraps up today's post.
It's a fairly CAS layout for me.
 
Don't forget about playing along with the May Challenge.
See you next time!

 
CE products used:

Friday, May 17, 2019

"Free" ~ a layout for 13 Arts with step by step

Hello, 3arts fans!
 It's Friday, yay! I hope you have some relaxing weekend plans! 

Sandi here with you today sharing my latest creation using the On The Wall paper collection. 
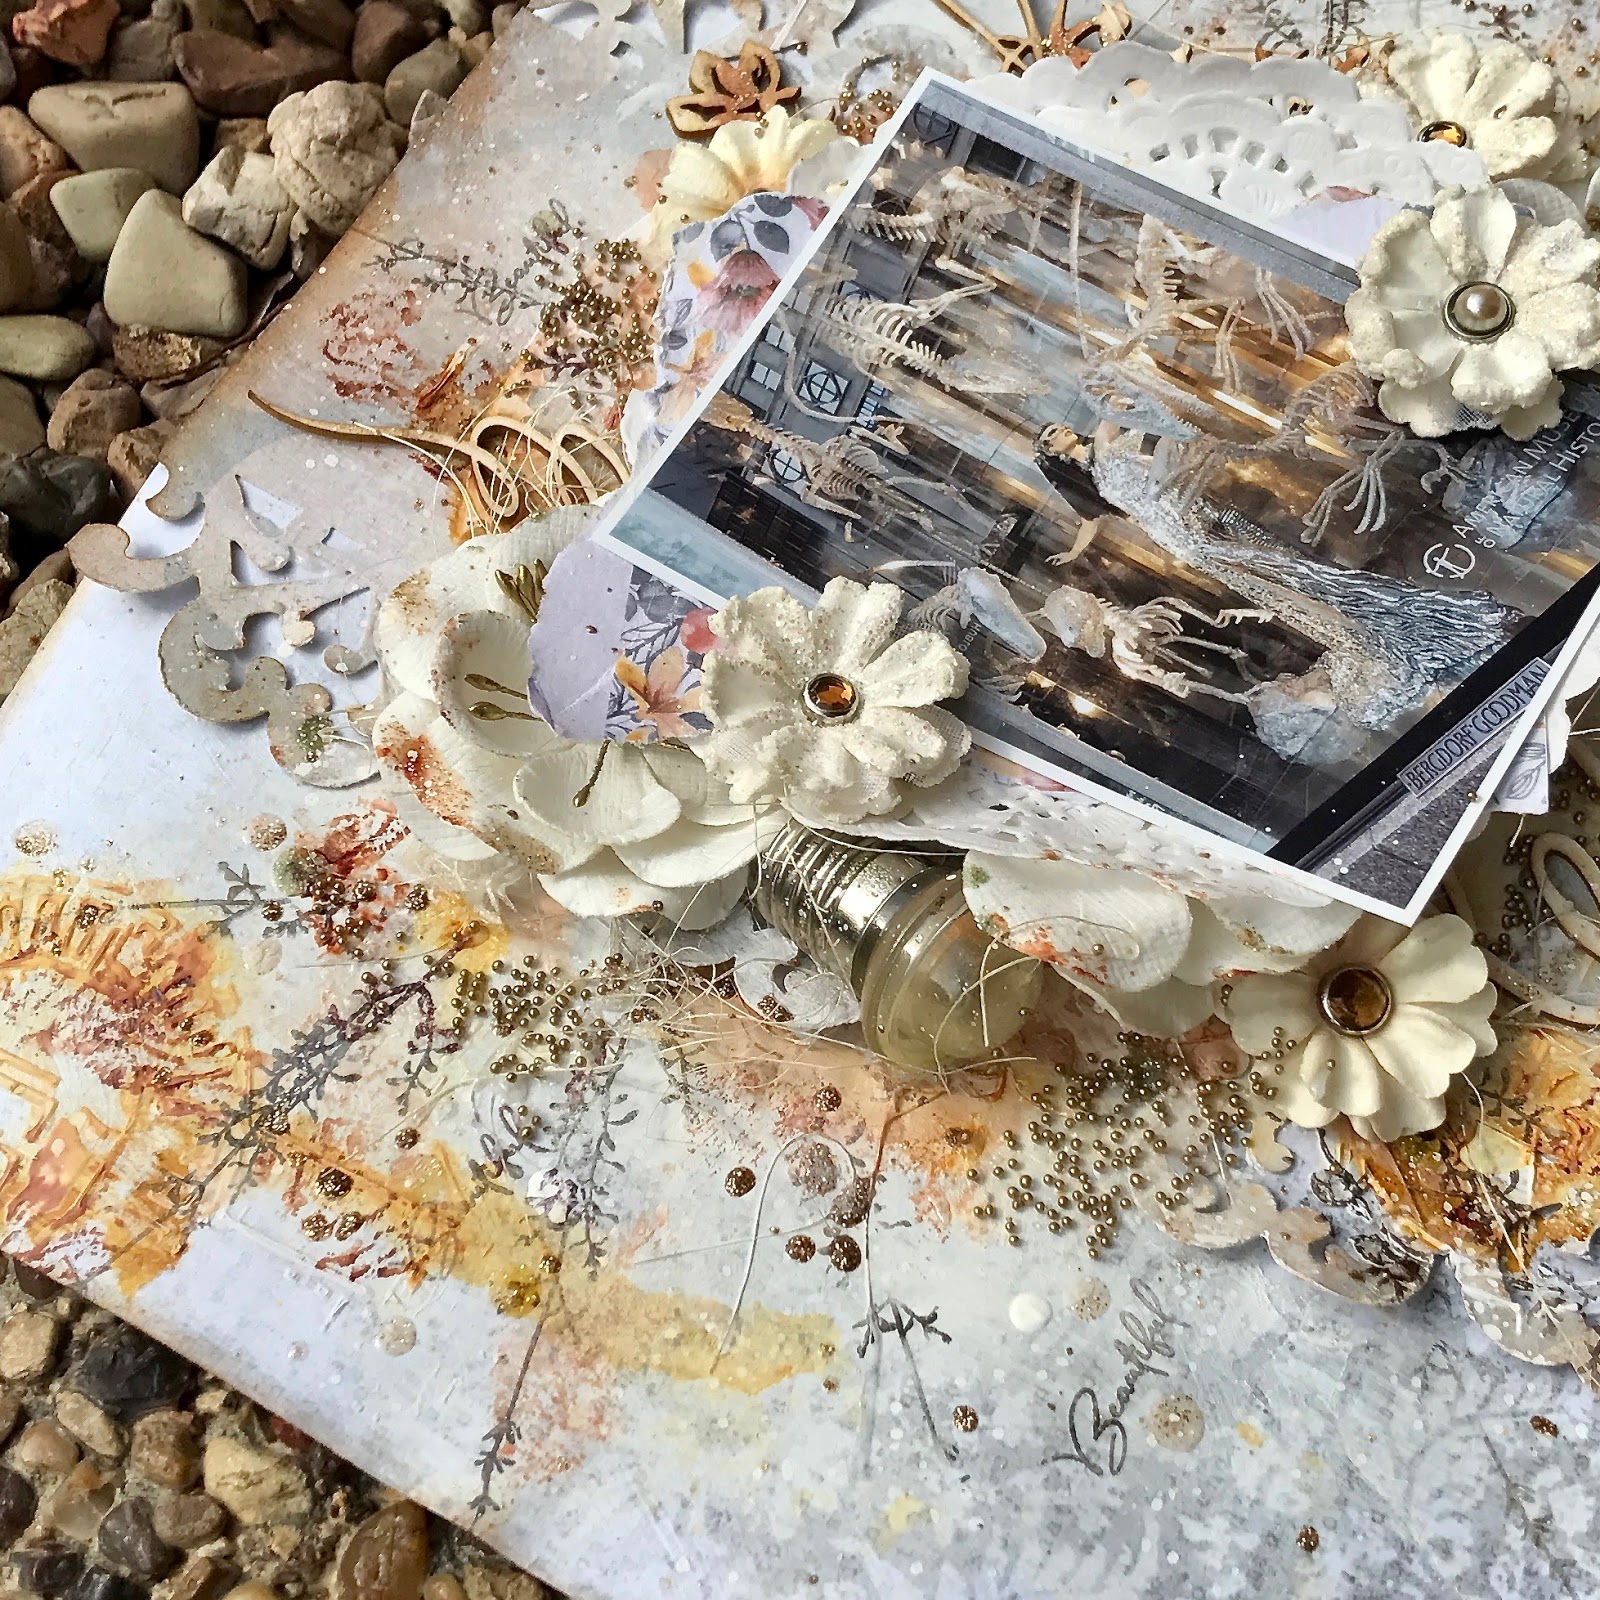
I was in the mood for something kind of fanciful and "off the wall",  so I chose to scrap this photo of a whimsical store front window at Bergdorf Goodman in New York City. The glammed up mannequin amongst dinosaurs bones intrigued me. 


Here are my steps:
First I cut a 5x12 inch strip of the On the Wall Bubbles paper and used an old punch on the edges and then distressed them a bit.  That strip was layered on top of the On the Wall Dripping paper with words, B.  Next Clear Gesso was used to prime the papers to prepare them for wet media products. At about the same time I lightened a focal section of the layout with watered down White Gesso.


After using a heat gun to dry the papers, I chose the His Time Stencil because it seemed fitting for the page. I pushed Modeling Paste through the stencil in 3 primary areas. Working in threes is a rule of thumb for me.
 While I was drying the modeling paste, I chose the Yellow Amber Water Ink to highlight the pattern of the stencil. By applying the ink with a small watercolor brush, I moistened the water ink with a mister and tilted my page to help the ink move in an interesting pattern. I am crazy over this color of Water Ink, so you'll probably see it often!


I also had some Brown Water Ink in my palette tray, so I used a mosist towelette to dab some of that here and there on the layout. I kept the towel nearby so that I could use it near the conclusion to add hints of the second color for depth. Once my focal area was definite, I stamped around that area with the wispy stem stamp from the Rose for You Stamp. The Beautiful stamp is from the same collection.


My photo was layered on a scrap from the On the Wall A4 Frames and a couple of paper doilies, then adhered to corrugated cardboard to give it height. I added Sisal ecru for texture before gluing the photo collage to the layout. Next I began working on my florals. The larger ones are from13 Arts white flowers, set of 4 and the small ones are from my stash ... probably 10 years old. The cute little lightbulb is something that my husband found in the flower bed while I was busy working on this page. When he showed it to me, I grabbed it, washed and bam, added it to my page with Multipurpose gel medium. I used the regular Gel Medium for adding my Gold microspheres at the end.


All the chipboard pieces were chosen to loosely mimic the dinosaur bones, so I had planned ahead exactly where I wanted to place them. They were tucked in while the glue holding the photo collage was still wet. And of course, I chose the Free title because it seemed fitting.


Next came the fun part of just adding extra water ink here and there wherever looked right. Then I began splattering with 13 Arts SPLASH White Ayeeda Ink,  SPLASH Old Gold Glitter Ink andSPLASH Old Silver Glitter Ink. Of course, it is important to cover your photo while doing this step. A little on the photo is okay but you don't want to ruin it.


Just a nice shot of the dimension and also how I added bits of the Water Inks to the florals, the chipboard and wherever I thought was needed.


This close-up shows the use of the moist towel with leftover Brown Water Ink. On the chipboards stems to the left, I also made sure to add some of the SPLASH Old Gold Glitter Ink.


Aw, one last shot of that cool lightbulb found out in the flower bed! Always be on the lookout for clever things to add to your designs! And don't forget to add a little texture at the end, such as the Gold microspheres.

Here are the 13 Arts products used: 
Clear Gesso

Wednesday, May 8, 2019

Ballet Album ~ Creative Embellishments

Hello, Creative Embellishments fans! 
Sandi Clarkson here with you today sharing a fun ballet slipper mini album that I created with awesome products from the CE store. 


First up, is the Ballet slipper mini album itself which is approximately 4.5"w x 6.7"h and is 6 laser cut pieces of chipboard for $3.99 regular retail price ... cheaper when there's a sale! I've been eyeing this set for awhile and finally took the plunge! 

To cover all the album chipboard pieces, I've used 13 Arts Rose Fields paper collection and 13 Arts gel medium.


This is simply the inside of the front cover and I opted to apply paper only with no embellishments, so that what was underneath would show through.  I might add an inscription when I gift this. 


This is my little cutie pie daughter in her favorite ballet costume of all time. To frame the photo, I've used the Doily Frame which was stained with walnut ink. A photo mat and flower were all that was added as the paper itself is so gorgeous! 


The next two pages hold photos of the same ballet costume with and without the umbrella open, so I've used them along side each other. On this left side, I added a photo mat, a die cut doily, a flower and a 13 Arts word sticker. 


For this right side, I actually stained the chipboard Mint box Flourish Frame set 2  and then embossed it with Stampendous Aged Gold embossing powder.  When I use this color, I usually only partially heat the powder until I get a little of the shine versus really shiny. Makes a nice chunky finish that way. 


This was actually a photo from my sweetie's very first ballet recital and will be swapped out with photo number one before I give this to her.   I added a photo mat and one of the frames from the Time Flies frame set. As was all the chipboard, it was stained with walnut. 


Here I used one of the Film Strip Picture frame set frames and embellished with a flower and word sticker. 


Since I was trying to not over-embellish with 3 dimensional pieces, I merely used another doily and a couple of flowers. This photo seemed to call for height though and I did end up adding some cardboard beneath it. 


We're almost done! 
This is the last photo and one that our whole family loves. When printed in full mode, you can see my daughters profile superimposed with the floor positioned photo. I framed this one with the Heart Frame set and added some florals and a word sticker. 


This is the back of the album and I wanted to leave this surface flat. So, it was papered and then I did ink the bottom side of the chipboard heart frame that sticks out on the left and added an offset flower to cover some glue. 

I didn't add any pockets or flaps due to personal preference but you certainly could! I've created an entire 12x12 dance album for my daughter previously, so this was just more for fun! 

I hope you are inspired to check out all the Mini Albums in the CE store. 
See you next time! 


Creative Embellishments products used:

Wednesday, May 1, 2019

13 Arts Challenge #78 ~ Rust

Hello, scrappy friends!

13 Arts  is having another challenge this month and the theme is Rust Effects.


For this fun challenge, I chose to create a project using the Wooden Hanger Tag and a vintage photo of my mother-in-law. My husband is older than I and his mother had him later in life, so she was the age of my grandparents. Older actually. So, I thought this was perfect for the Rust challenge!


 I started by covering the tag with the Conversations on Trains Ticket Master A4 paper with Gel Medium. I also coated the paper with the gel medium, so that I could apply some product.
I added some texture to tag using the Wallpaper Stencil and a couple of paints: Ayeeda Paint Vivid Vintage Brown Sugar and Ayeeda Paint Metallic Dark Yellow. I also darkened the edges of the tag with Brown Water Ink.

The little heart dangle chipboard is from Creative Embellishments and that is what I chose for my Rust effect focus. I coated it with Gel Medium and then applied the Rust Effect Powder ~ Rusty Bronze and sprayed it with vinegar. For more effect, I also applied the 13 Arts Rust Reagent. I allowed that to air dry for 24 hours and it created a nice rusted texture.


To add some color and patina to the piece, I softly painted with Ayeeda Paint Metallic Red BronzeAyeeda Paint Pearl GoldAyeeda Paint Vivid Vintage Cinnamon Latte and Rainbow Color Turquoise Duo

While that was drying, I continued with my tag, adding a small crochet doily under my photo which was mounted on more of the Conversations on Trains Ticket Master A4 paper. I added Veda's name with some typewriter keys from Creative Embellishments which were altered with the Brown Water Ink. Lastly, I adhered the Rusty heart dangle, the bee from Metal Insects and some crinkle ribbon from my stash. 

This was so fun! 
I hope you will play along! 

13 Arts products used:
Rust Reagent


Creative Embellishments products used:

May Challenge ~. Creative Embellishments!

Hello, Creative Embellishments fans! 
Yay, it's time for the May Challenge over on the Creative Embellishments blog


This month I was inspired by the "gem" in the image photo as well as the color purple. Sadly, my precious sister-in-law passed away in March.  (Purple was her favorite color.)  She was absolutely the sweetest lady I've ever known.  Susanna had a heart of  gold as well as a passion for her family. She and I did life together albeit long distance ... raising babies, both making a home for our respective families and of course, crafting together. It was Susanna that got me started in scrapbooking, so I had to make a special tribute page in her honor. 


I began my page by creating the background using clear gesso, modeling paste, water inks, the Falling heart stencil and the Distressed moroccan stamp. My paper and medium are all 13 Arts. Then I added paper layers, my chipboard and some florals.


Here is another angle of the left side showing more of the stencil work and stamping as well as a shot of the gorgeous Dripping heart lace border which was altered with walnut stain and dabbed with white gesso at the end. 


I used the Large clock face 4 inch as a photo layer along with some torn papers from the 13 Arts paper collection. The twist this month is to add something with wings. For me, time flies, so it surely has wings. But for the purists out there, I added a butterfly. 


For texture, I've added some sisal and some 3D art stones along with my florals. 


The Heart of gold title piece was perfect for this layout. It was altered with 13 Arts paint and dabbed with white gesso. I added one gold flat backed gem to the heart.

Here is the May Challenge image:
It is not a color challenge but I did happen to use those colors.


Thanks for coming by today!
We hope that you can find time to play along!

Sandi


Creative Embellishments products used: 

** Paper and medium are 13 Arts **