Wednesday, April 22, 2015

My Creative Scrapbook April Build a Page tutorial


Hello, My Creative Scrapbook fans! Thanks for stopping by! Sandi here with you today sharing how I put my "You & Me" page together using the gorgeous April Limited Edition Kit. Every month seems to be a new fave Kit for me but this one had all my favorite colors, so I was really in scrappy heaven!


I wanted to use Marion Smith's Junque Gypsy "Nota Bene" paper in a  unique way, so I decided to rotate the paper and pair it with some of Prima Bella Rouge "Les Rosas" paper.  This was step one. 


Then I took a remaining portion of the "Les Rosas" paper and turned it over to show the beautiful red roses. Using teal and red always makes me happy as it's a favorite color combo. I thought it would work beautifully with the "Nota Bene" paper to accent those flowers.  Some punching along the edges of the red paper helped add a shabby, romantic touch. 


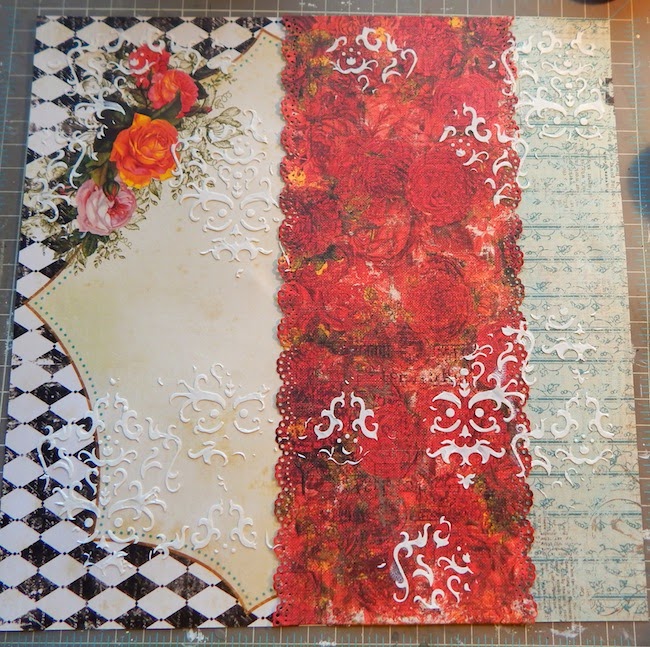
Next I prepped my paper with Clear Gesso on both side of the paper, then added some texture with a Donna Downey stencil and molding paste from my stash.  I also added splashes and droplets of color using my Prima Bloom Sprays in Light Teal and Tea Stain. 


Then the layering fun begins with some of the Prima Bella Rouge note cards and Marion Smith's Romance Novel Chapter 2 papers as well as some white doily die cuts created with a Prima die from my stash. 


Here it is after I've layered and added my Prima florals, Bella Rouge brads and butterflies cut from the section of the Junque Gypsy paper that I didn't use. You know this is a great Kit when you open it and find some of your favorite flowers in there! Yes! 


Here is a little close-up showing where I've tucked gauze here and there for texture. And the Bella Rouge brads are just gorgeous. 


Another close-up where you can see some of the misting. 


And here again is the finished layout. A sweet grandson kissing his baby sister. What could be better than that? 

Friday, April 10, 2015

My Creative Scrapbook Reveal, part 2


"Today"

Hi, there! I'm back today with my last 2 projects from this month's Limited Edition Kit at My Creative Scrapbook. 

As I've mentioned before, this kit has a beautiful blending of 4 paper collections, Prima's Bella Rouge, Marion Smith's Junque Gypsy and her Romance Novel Chapter 2, as well as Blue Fern Studios Sanctuary papers. There are also some great, great Prima flowers in this Kit.  Mixed in are some great Bella Rouge embellishments and a Blue Fern Studios chipboard that help round out the Kit.  For more info on how to join our Kit Club, visit HERE

This is literally one of the fastest layouts that I've made in a while but it seems to be a favorite with people because of the high contrast. I've scrap lifted myself somewhat which took some of the design time away.  It's very shabby, romantic actually except for the bold colors and has lots of fun layers. 

Close-ups:


***

"Things I Love"

I again focused on the Blue Fern Sanctuary "Conservatory" paper and used it as my background paper. Then added some stenciling with whitened molding paste.  Lots of layers under the photo, along with a sweet Marion Smith Romance Novel 2 tag. Photo credit for both photos used today go to Magnolia Adams Photography. 

Close-ups:


Thanks for coming by today! Your visits are always appreciated. It's so hard these days to get around to all the blogs and social media, so your visits mean a lot. 

For more inspiration, please visit our Design Team Gallery.

Hope you have a great weekend! 

Monday, April 6, 2015

My Creative Scrapbook April Kit Reveal!

"You and Me"

I'm so excited about this month's Reveal at My Creative Scrapbook! The Limited Edition Kit is pure heaven .. loads of gorgeous paper, flowers and embellishments. It's my fave colors, too! This kit has a beautiful blending of 4 paper collections, Prima's Bella Rouge, Marion Smith's Junque Gypsy and her Romance Novel Chapter 2, as well as Blue Fern Studio's Sanctuary papers. There are also some great, great Prima flowers in this Kit .. ones I reach for again and again in my own private scrapping. Mixed in are some great Bella Rouge embellishments and a Blue Fern Studios chipboard that help round out the Kit. For more info on how to join the Kit Club, visit HERE

Above is my first project, where I've turned my fabulous Junque Gypsy paper on it's side to get the flowers positioned in the upper left corner. Because I wanted to use it non-traditionally, I've paired it with some Bella Rouge papers. I have a tutorial later this month on exactly how I created my layout. Aren't those 2 grandkids just the sweetest? (Photo credit goes to Magnolia Adams Photography.) 

Here are some close-ups:


***

"True Story"

Next up is my "Lucy" page for this month. Photo is from Flickr.com, reportedly a 1940s publicity photo for the movie "Too Many Girls." I also saw it credited as 1932.
 Anyway, I've use some gorgeous Blue Fern Sanctuary "Correspondence" paper here. I've also used the Blue Fern Studio April sketch as inspiration. For layers, I've used the neutral sides of the Bella Rouge, Junque Gypsy and Romance Novel Chapter 2. This one has some fussy cutting, stenciling and gesso-ing with lots of pretty Prima blooms. I've also tucked in my altered BFS chippy, the Boston Lattice. 


After my chippy was painted, I misted it and then added random sections of Stampendous Aged Gold embossing powder and hit it lightly with the heat gun. 


Some white splatter paint for fun. 


Embellies. 


And a fussy cut subtitle with some flowers and brads finish things off. 

Here's a photo of the April LE Kit:


I'll be back on the 10th with 2 more projects from this gorgeous Kit. For more inspiration now, please visit our Design Team Gallery

Hope to see you then! 


Saturday, April 4, 2015

7 Dots Tutorial, Guest Designer!


Hello, 7 Dots Studio followers!  Sandi Clarkson here with you today as a Guest Designer for 7 Dots,  sharing a tutorial on how I built my "Perfect Day" layout.  The photo (that I've been wanting to scrap) is of a granddaughter and her horse.  I plan to give her this layout as a gift. 


First I selected some favorite papers from the Soulmates collection as well as my photo.  I love the neutral tones, so perfect for an outdoor-sy type of page. 


Then I tore 2 sheets in a ragged fashion taking care to make one a bit longer than the other and adhered them to my Maybe Today background paper. 


I tore 2 more square-ish layers and selected a few embellishments to use. 


Next I prepared my background with a thin coat of white gesso and created texture with a stencil and molding paste. 


I altered a piece of chipboard from my stash with various shades of brown ink, acrylic paint and some aged gold heat embossing here and there as an accent. This piece will frame the photo. 


Going back to the background paper, I misted 2 different Prima Color Blooms colors, Tea Stain and Antique Gold and allowed them to drip. After using a heat gun to dry, I did some background stamping with a bokeh patterned stamp. The brown circles you see are embossing powder that I later brush partially away. 


I added a few more strips from my already torn paper before adhering my photo to corrugated cardboard and adding to the page. Everything looks a bit messy at this point but I know from experience that the end result will look great. 


After the photo was in place and elevated, I began adding my flowers and miscellaneous embellishments.  Some of my florals are actually quite old but the colors were perfect, so I used them! 


As a finishing touch I added more Stampendous gold heat embossing on random sections of the page.  The layout has a lot of sparkle in real life.  At this point, I had planned to do some more painting around the photo but I was pleased with it, so I decided it was done except for gessoing everything to blend. A few pearls complete the page. 


So, here it is again in it's completed form. 

And here are a few close-ups:


7 Dots Products Used:
Soulmates Maybe Today
Soulmates Power of Love
Soulmates Sensuality
Soulmates Elements 6x12
Thoughts Keeper No. 6

I want to thank Tusia and 7 Dots Studio again for having me as a Guest Designer this year. As one of the two designers representing the USA, I am quite humbled to have been chosen to be here today!


Thursday, April 2, 2015

My Creative Scrapbook April LE Kit Sneak Peeks

It's time for our April My Creative Scrapbook Sneak Peeks!  
Please hurry on over to the website to reserve your kits.

Here are my sneaks for the Limited Edition kit:


The full Reveal is on the 6th of April. So see you then! 


I'm so excited about this beautiful romantic Kit! 
It's another all-time fave! I swear they just keep getting better and better! 

Wednesday, April 1, 2015

7 Dots Guest Design Team spot! Finally!


 I am beyond thrilled to be Guest Designing at the 7 Dots Studio Blog today! 
As one of the two designers chosen from the USA, I am humbled and quite ecstatic. 
A dream come true! 

Here are my first 2 projects. 
______

 "Be Amazed"

I am so in love with 7 Dots Studio products, that it was difficult to decide where to begin. Tusia sent me a generous package full of Thoughts Keeper and Soulmates papers and embellishments.
 This lovely black and gray floral really spoke to me and acts as my base. I prepared the paper with a coat of white gesso and then added some texture with molding paste and a stencil.  Unfortunately, part of it was layered over but that it quite alright. I know it's there. 

Next, I added my layers, florals and embellishments. A small amount of inking and distressing was done to the vertical paper strips prioring to adhering them. Then the main body of work was accented with lime-green Gelato. 


You can see that bits of black thread were added in for texture. 


Some punchinella ribbon for interest along with various pieces from the Elements sheet. 


I love that the paper already looks stamped.


This is my "title" corner. And a good close-up of some of the white paint splattered over the page as a finishing touch. 


My center accent is from the Elements Sticker sheet, so perfect for directing your thoughts towards the story told in the photo itself. 

7 Dots Studio Products used:
Thoughts Keeper 3
Thoughts Keeper 4
Thoughts Keeper 5
Thoughts Keeper Element Stickers 6x12
Thoughts Keeper Elements 6x12
______


"You and Me"

For my second project, I decided to do something more vintage, romantic. So, I started with random punch work and distressing, then followed with adding texture using a stencil and molding paste. I highlighted these areas with white acrylic paint, then spitzed them with teal mists. I love to let the mist run down the page and then use a wet towel to sponge off. 


A close-up of some of the stenciling and color. These papers take media so well. 


Lots of yummy 7 Dots layers! 


And a Word Sticker to serve as my title. 


Just a little corner cluster with florals, a Tag and Element sticker. Gauze tucked in here and there adds to the romantic feel. 

7 Dots Studio Products used:
Thoughts Keeper 1
Thoughts Keeper 2
Thoughts Keeper 6
Thoughts Keeper Word Stickers 6x12
Soulmates Tags 12x12

It is such an honor to Guest Design for 7 Dots Studio. I can't say enough good things about them and their fabulous products! And I thank them so much for having me here this month. I'll be back on the 4th with a 7 Dots tutorial for you. 

Sandi